
Learning how to find bedding areas requires a four-phase, eight-step scouting funnel: pinpointing terrain edges on digital maps, backtracking winter trails, verifying physical bed depressions in spring, mapping exit rubs, glassing from long range, deploying perimeter trail cameras, and testing wind thermals. Completing this moderately difficult process takes 6 to 16 hours across seasons, and success depends entirely on locating beds without alerting the deer to your presence.
Before You Start: Scouting Prerequisites & Gear
| Requirement | Details & Specifications |
| Total Time Required | 1–2 hours (digital e-scouting) + 4–12 hours (field verification and setup) |
| Difficulty Level | Intermediate (requires basic map reading and scent control discipline) |
| Typical Cost Range | $0 (free maps + post-season boot scouting) to $1,500+ (premium optics + cellular cameras) |
| Optimal Season Window | February–April (in-person ground scouting); July–December (distant perimeter observation only) |
| Prerequisite Knowledge | Ability to read 10-foot to 40-foot elevation contour lines and check local prevailing wind directions |
Required Tools & Materials Checklist:
- Digital Mapping App (1): onX Hunt, HuntStand, or HuntWise subscription ($30–$100/year), or free USGS Topo Maps / Google Earth Pro desktop software.
- Wind & Thermal Tester (1): Unscented milkweed pod with dried silk seeds ($0–$5) or a talc powder wind bottle.
- Optics & Support (1 set): 10×42 or 12×50 binoculars, or a 20–60x spotting scope mounted on a pan-head tripod ($150–$1,200+).
- Trail Cameras (2–4 units): Cellular models (Tactacam Reveal or Moultrie Mobile, $80–$160/camera + $5–$13/month data) or low-glow SD card cameras ($50–$100) with heavy-duty mounting brackets.
- Field Measurement & Marking Kit (1): 60-inch cloth tape measure, biodegradable high-visibility surveyor flagging tape (for off-season training only), and a smartphone GPS capable of offline waypoint caching.
- Footwear (1 pair): 16-inch knee-high rubber boots (for scent-free perimeter camera hanging) and broken-in hiking boots (for spring ground recon).
Phase 1: E-Scouting via Digital Maps (Zero Disturbance)
Step 1: Pinpoint Upper-Third Terrain Contours on Topo Layers
Mark every ridge point, bench, and saddle located within the upper one-third elevation band of hills on your digital topographic map.
Open onX Hunt, HuntStand, or HuntWise and enable the Topo or Hybrid basemap layer. Scan hilly terrain for tightly packed contour lines indicating a steep slope, then locate the military crest—the exact elevation line 15 to 35 vertical feet below the true topological peak where the slope breaks and transitions from flat ridgetop to steep drop-off. Drop a digital waypoint on four specific micro-features along this upper-third band:
- Leeward Ridge Points: Finger ridges jutting outward where a deer can keep the prevailing wind at its back while looking downhill over a 180-degree valley.
- Sidehill Benches: A sudden widening gap (50% to 100% wider spacing) between two tight contour lines on a steep slope, indicating a flat shelf 10 to 30 yards wide.
- Ridge Saddles: Low-elevation dips between two high peaks that funnel passing deer within scent range of an adjacent point bed.
- Solar Aspect Slopes: Mark north- and northeast-facing slopes (or wet riparian river bottoms) for early autumn hunts when daytime temperatures exceed 65°F (18°C). Mark south- and southwest-facing slopes for late-season winter hunts below 35°F (2°C), where afternoon sunlight maximizes thermal solar gain.
- You’ll know it worked when: You have 5 to 12 waypoints per 200 acres sitting directly on contour breaks 15 to 35 feet below the highest elevation lines, rather than centered on flat ridgetops.
- Common Mistake: Pinning the exact topological center of a hill. Mature bucks rarely bed on flat peaks because they cannot see predators climbing the steep sides below them; keep pins on the drop-off edge.
Step 2: Isolate Stem-Density Transitions and Swamp Hummocks on Satellite Imagery
Switch your map to satellite aerial view and filter your terrain pins down to locations where two distinct vegetation types intersect or where dry islands sit inside wetlands.
Toggle between summer leaf-on and winter leaf-off historical satellite layers (available in Google Earth Pro and HuntWise). In flat terrain, agricultural parcels, or marshland where contour lines are absent, scan for physical security cover:
- Swamp Hummocks & Marsh Islands: Zoom in to a 100-foot scale over cattail marshes, tamarack swamps, or flooded river oxbows. Drop pins on isolated circular clusters of hardwood trees or brushy humps measuring 15 to 50 yards across surrounded by standing water.
- Young Clear-Cuts & Regeneration: Identify timber cuts that are 2 to 7 years old (appearing as dense, mottled green/brown brush rather than uniform mature tree canopies).
- Doe vs. Buck Proximity Filters: Mark thick secondary brush, bramble patches, and feathered field edges situated 50 to 250 yards from agricultural fields (soybeans, corn, alfalfa) as probable doe family group bedding. Mark isolated pockets—such as a single blowdown, brushy finger draw, or cedar thicket 300 to 800+ yards away from public parking lots and food plots—as probable mature buck sanctuaries.
- Thermal Conifer Pockets: Outline dark-green patches of hemlock, white cedar, or spruce on winter aerial imagery, which intercept deep snow and reduce wind chill in late winter.
- You’ll know it worked when: Every waypoint sits within 20 yards of a hard structural edge (such as mature timber meeting 5-year-old brush, or cattails meeting a dry hardwood island).
- Common Mistake: Using a single outdated satellite image. A 3-year-old satellite photo may show an open logging clear-cut that is now a 10-foot-tall briar jungle, or vice versa; always verify timber harvest dates using historical timeline sliders.
Phase 2: Post-Season Ground Verification & Snow Tracking
CRITICAL SEASONAL WARNING: Execute Steps 3 through 5 only between late winter and early spring (February 1 through April 15), immediately after hunting seasons close. Walking directly into suspected bedding thickets between September and December contaminates the sanctuary with human ground scent, pushing mature bucks onto nocturnal schedules or neighboring properties for 2 to 4 weeks.
Step 3: Backtrack Fresh Tracks in Winter Snow from Food to Cover
Follow fresh deer tracks backward from evening feeding grounds into dense security cover after a winter snowfall of 2 to 6 inches.
Wait 12 to 24 hours after a fresh snowfall in January, February, or March. Start at an active winter food source—such as standing corn, cut brassicas, or woody browse (red osier dogwood and briars)—at 10:00 AM. Locate a set of sharp, crisp tracks entering the field edge and walk them in reverse (against the direction the toes point) back into the timber.
- To verify a mature buck track before following it, measure the individual hoof imprint: a mature buck track typically measures 3.25 to 3.75+ inches long with a wider, blunted toe splay and dewclaw impressions in shallow snow, whereas an adult doe track rarely exceeds 2.75 inches.
- Log the trail on your GPS app using the active breadcrumb tracker. Note where the deer meanders through browse staging areas (50 to 100 yards outside the thicket) before straightening its line directly into heavy horizontal cover.
- You’ll know it worked when: The reverse track line terminates at a melted, oval basin in the snow tucked tight against a windbreak, confirming the exact travel corridor and bed in a single hike.
- Common Mistake: Tracking forward on morning tracks entering bedding cover. Walking forward along a fresh morning trail jumps the deer out of its bed, teaching it that humans follow its scent trail into that specific sanctuary.
Step 4: Inspect and Measure Physical Bed Depressions and Backboards
Walk directly into your digitally pinned thickets between February and April to locate, measure, and inspect bare oval depressions in the leaf litter or marsh grass.
Approach your GPS waypoint from the downwind side so you can see the terrain the way a predator would. Search the base of large trees, root balls, blowdown treetops, rock ledges, or chest-high grass hummocks. When you find a smooth, compacted oval depression worn down to dirt or flattened sedge grass, verify its identity and occupant using three physical forensics checks:
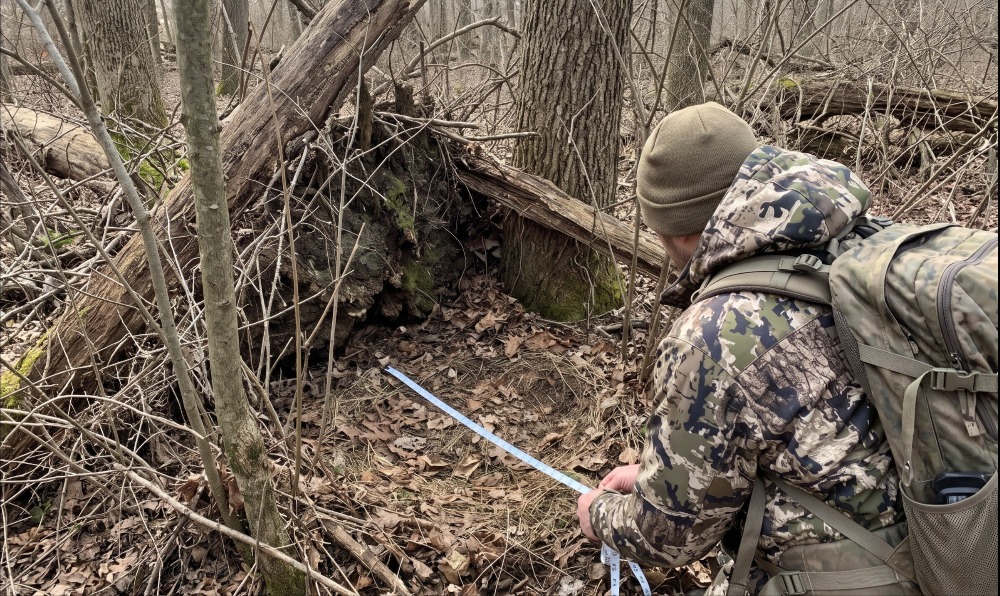
- Measure Bed Dimensions: Pull out your cloth tape measure. A solitary mature buck bed measures 40 to 48 inches long by 22 to 26 inches wide, positioned alone with its rear pressed directly against a “backboard” (a tree trunk at least 16 inches wide, a root wad, or a tangled deadfall) to prevent rear predator attacks. Doe family beds appear as circular clusters of 3 to 10 smaller beds (each measuring 30 to 36 inches long by 18 to 20 inches wide) spaced 5 to 15 yards apart so the group can watch multiple angles simultaneously.
- Verify Hair and Scat: Drop to your knees and inspect the dirt or flattened grass inside the oval. Look for shed winter guard hairs (1.5 to 2.5 inches long, hollow, slightly kinked, gray-brown with white tips) and fine underfur melted into frost or pressed into mud. Check the perimeter within 10 feet for multiple piles of droppings of varying ages (fresh black/glossy pellets alongside bleached, dry brown pellets), which proves the bed is a primary multi-day sanctuary rather than a random single-use night bed.
- Conduct the Squat Test: Sit or kneel directly inside the bed at a bedded deer’s eye level (30 to 36 inches off the ground). Look outward in the direction the bed’s long axis faces. A primary daytime buck bed will offer an unobstructed visual lane of 40 to 150 yards downwind (usually looking downslope or across an open marsh channel) while keeping thick brush or the prevailing wind directly behind your shoulders.
- You’ll know it worked when: You confirm a bare 40+ inch oval containing deer hair, backed against solid vertical cover, with a clear 40-to-150-yard sightline at a 36-inch kneeling height.
- Common Mistake: Confusing turkey scratchings or night beds for daytime sanctuaries. Wild turkey scratchings scatter leaves randomly in 3-to-6-foot patches without a smooth, body-compressed rim; deer night beds sit in open fields or unprotected flat woods with zero overhead canopy or rear backboard protection.
Step 5: Map Exit Trails, Staging Rubs, and Overhead Licking Branches
Trace the worn footpath leading out of the bed for 100 yards toward evening food sources, marking buck rubs and staging scrapes along the way.
Stand at the edge of the verified bed and identify the primary exit trail (the beaten path showing clipped brier tips or dogwood buds at a 45-degree ragged angle—deer lack upper incisors and tear twigs rather than slicing them cleanly like rabbits). Walk outward along this trail away from the bed for 50 to 120 yards until the dense security cover opens slightly into transition timber.
- Read Rub Directionality: Inspect saplings measuring 1.5 to 4 inches in diameter that have bark shredded 18 to 36 inches (thigh-to-chest height) off the ground. Look at which side of the tree is scarred: if the raw wood faces toward the bed, the buck made that rub while walking away from his bed in the late afternoon (because a buck pushes his head toward the destination food source as he walks out).
- Identify the Staging Area: Locate a concentration of 3 to 10 rubs clustered within a 30-yard radius alongside bare dirt scrapes underneath a low-hanging horizontal hardwood branch 48 to 60 inches above the ground. Drop a distinct GPS pin labeled “Staging Ambush Zone” here—this is where the buck stands up during the last 30 to 45 minutes of daylight before entering open fields after dark.
- You’ll know it worked when: You have a mapped line connecting the core bed pin to a staging area pin 50 to 120 yards away, verified by exit-facing sapling rubs and clipped browse.
- Common Mistake: Planning to hang your treestand inside the bed cluster where the heaviest rubs are located. Bedside rubs are often made at 3:00 AM when the buck returns to bed; hunting that close guarantees the deer sees or smells you climbing into position.
Phase 3: Pre-Season & In-Season Non-Invasive Verification
Step 6: Glass Entry and Exit Corridors from 300 to 800 Yards Away
Set up a tripod-mounted spotting scope or high-power binoculars 300 to 800+ yards away during late summer or hunting season to confirm live occupancy without leaving scent.
Between July and November, never walk inside the 150-yard perimeter of your mapped beds. Instead, select an elevated hillside, field edge, road pull-off, or distant observation treestand located 300 to 800 yards away with a clear line of sight to the bedding thicket’s edge. Ensure the wind is blowing from the bedding area toward your face.
- Evening Observation Sit: Arrive 2.5 hours before legal sunset. Lock your 10x/12x binoculars or 20–60x spotting scope onto a tripod and grid-search the brushy transition edge where your Step 5 exit trail meets open terrain. Note the exact minute deer stand up to stretch, shake, and browse—bucks bedded closest to the edge will emerge 15 to 40 minutes before dark.
- Morning Observation Sit: Arrive 30 minutes before legal sunrise. Watch deer feeding in open agricultural fields or clear-cuts and track the exact brush finger, ditch crossing, or ridge point where they vanish back into heavy cover during the first hour of daylight.
- You’ll know it worked when: You visually observe target deer entering a specific 30-yard brush transition at dawn or emerging from it prior to sunset without a single deer looking toward your observation post.
- Common Mistake: Handheld glassing without a tripod. Hand tremor at 400+ yards makes it impossible to spot the flick of an ear or an antler tine rising inside chest-high goldenrod or young regeneration brush.
Step 7: Hang Perimeter Trail Cameras 75 to 150 Yards Outside the Sanctuary
Mount cellular or low-glow trail cameras on travel funnels 75 to 150 yards away from the core bed to log daylight arrival and departure timestamps.
Select a narrow pinch point along the exit trail mapped in Step 5—such as a creek crossing, fence gap, ditch head, or the 50-to-120-yard staging scrape—situated 75 to 150 yards outside the actual bed. Wear knee-high rubber boots and scent-free gloves, and hang the camera between 10:00 AM and 2:00 PM (ideally right before a rainstorm to wash away ground scent).
- Mounting Height & Angle: Strap the camera to a tree 60 to 72 inches (5 to 6 feet) off the ground using an adjustable metal bracket, and tilt it downward at a 10-to-15-degree angle aimed at the trail 15 to 20 feet away. This keeps the camera chassis above a deer’s natural 40-inch horizontal line of sight.
- Directional Orientation: Point the camera lens North (or South in deep shade) so low-angle sunrise and sunset rays never shine directly into the Passive Infrared (PIR) sensor, preventing false triggers and washed-out silhouettes.
- Settings: Set trigger speed to
< 0.5 seconds, capture mode to 2- or 3-photo burst, and recovery delay to 15–30 seconds over trails or 1 minute over staging scrapes. - You’ll know it worked when: Your camera records unspooked deer walking past during legal shooting light (30 minutes before sunrise to 30 minutes after sunset) without staring up at the camera housing.
- Common Mistake: Walking in every 7 days to pull SD cards from a chest-high camera 30 yards from a bed. If using non-cellular SD card cameras on public or pressured land, leave them untouched for 3 to 6 weeks, or check them only during midday rainstorms.
Phase 4: Hunt Setup & Thermal Verification
Step 8: Test Thermal Currents and Set Your Ambush 50 to 100 Yards Out
Verify morning and evening thermal airflow using milkweed seeds and position your stand 50 to 100+ yards downwind or down-thermal of the bed.
Before hanging a treestand or setting a ground blind along the staging corridor, test how local topography alters the prevailing wind. Release a pinch of milkweed silk seeds every 15 minutes during the first two hours after sunrise and the final two hours before sunset, watching their path for at least 60 yards:
- Morning Rising Thermals: Once morning sunlight warms the ground surface by 3°F to 5°F, air rises uphill at 2 to 4 mph. If you hunt a morning return-to-bed route, set your stand above the bed elevation on the ridge crest so rising thermal currents carry your scent into the upper canopy away from the military crest.
- Evening Falling Thermals: During the final 60 to 90 minutes of daylight as the hillside cools and enters shade, cool air drains downhill like water into creek bottoms at 2 to 4 mph. For afternoon hunts, set up 50 to 100+ yards away from the bed along the staging exit trail, positioned either below the bed elevation or on a crosswind angle where falling thermals pull your odor into a ditch away from the deer’s path.
- Identify the Thermal Tunnel: Where a prevailing wind blows over a steep ridge peak (top down) and meets rising morning thermals (bottom up), a turbulent horizontal vortex forms roughly two-thirds of the way up the slope. Bucks bed right inside this thermal tunnel to smell both directions at once—never let your milkweed float into this seam.
- You’ll know it worked when: Released milkweed seeds drift consistently along a clear path 40+ degrees away from both the bedding thicket and the staging trail you are watching.
- Common Mistake: Trusting a smartphone weather app’s wind direction in hill or swamp country. Weather stations measure wind at 30 feet in open airports; deep timber bowls, ridge points, and cold river water deflect ground currents by 90 to 180 degrees.
Method Comparison & Selection Matrix
| Scouting Method | Upfront / Running Cost | Disturbance Risk | Proof Certainty | Ideal Terrain & Context |
| E-Scouting (Maps & Apps) | $0 – $100/year | Zero | Theoretical (Probable) | Unfamiliar public tracts & large multi-thousand-acre parcels |
| Post-Season Boot Recon | $0 | Low (Feb–April off-season) | Definitive (Physical beds/hair) | Big woods, steep hill country, and brushy river bottoms |
| Snow Backtracking | $0 | Low (Winter post-season) | Definitive (Exact route map) | Northern timber and Midwestern snowbelt habitats |
| Long-Range Glassing | $150 – $1,200+ | Near Zero (300–800 yds out) | High (Live visual confirmation) | Agricultural edges, clear-cuts, prairies, and open hillsides |
| Perimeter Trail Cams | $50 – $160/cam (+ $5–$13/mo) | Low–Moderate (75–150 yds out) | High (Timestamped inventory) | Private acreage, leased parcels, and pinch-point funnels |
Common Mistakes and How to Fix Them
1. Accidentally Jumping a Buck Out of a Bed In-Season
- The Cause: Walking too close to dense cover while scouting or hanging a stand between September and December, causing a deer to crash out of brush within 40 yards.
- How to Fix It (The “Bump-and-Dump” Protocol): Do not flee in panic. Immediately walk to the exact bed the deer just vacated—your scent is already there, so inspect the bed while the damage is done. Verify if the bed is worn to bare dirt with multi-age droppings (confirming it is a primary core bed). Drop a milkweed seed to see how the wind is blowing, back out 60 to 80 yards downwind along the main exit trail, and hang your mobile treestand immediately. Mature bucks are fiercely attached to primary security beds and frequently circle back within 12 to 48 hours (often the very next morning or evening) under the exact same wind condition to check if the predator has left.
2. Spring Bedding Thickets Are Empty Come October
- The Cause: Scouting in March when deciduous trees are bare and agricultural fields are dirt, without accounting for seasonal shifts in foliar cover and food sources.
- How to Fix It: Separate your spring GPS pins into Fall Thermal/Foliage Beds vs. Late-Winter Survival Beds. Beds located inside open hardwood ridges surrounded by knee-high briars and adjacent to white oak stands are prime October/November locations. Beds concentrated inside dense south-facing cedar swamps or right next to picked waste-grain fields are January–March thermal beds; hold off on hunting those pins until daytime highs drop below 30°F (-1°C) and foliage falls.
3. Finding Cluster Beds That Only Produce Does and Yearlings
- The Cause: Focusing on easy-to-find clusters of 4 to 8 oval depressions located 100 yards inside timber adjacent to soybean or alfalfa fields.
- How to Fix It: Treat doe bedding areas as November Rut Magnets rather than early-season buck beds. Between September and mid-October, leave doe clusters completely untouched. Return between October 28 and November 20 (pre-rut and peak breeding phases) and set up 60 to 80 yards downwind of the doe bedding thicket—cruising mature bucks will parallel the downwind edge between 8:00 AM and 1:00 PM to scent-check the entire doe group without entering the brush. To find the buck’s October bed, search 150 to 300 yards deeper into the nastiest, wettest isolated cover on the property.
4. Getting Winded by Afternoon Thermal Drop Before the Deer Arrives
- The Cause: Setting up downhill of a ridge-bench bed for an evening hunt because the prevailing weather-forecast wind is blowing uphill.
- How to Fix It: As soon as shade covers your hillside 60 minutes before sunset, cooling air overrides light prevailing winds (< 7 mph) and pours downhill at 2–4 mph straight into a low stand setup. Relocate your evening stand same-elevation (side-hill) and 75 yards lateral to the bed, or hunt that low stand exclusively on evenings when steady prevailing winds exceed 12 to 15 mph, which is strong enough to overpower weak thermal down-drafts.
5. Spooking Bedding Areas During Morning Stand Access
- The Cause: Walking across open agricultural fields or crossing an active entry trail in the dark at 5:30 AM while deer are still feeding and watching the timber edge.
- How to Fix It: Abandon morning hunts near evening food edges. Reroute your morning entry through watercourses (wading knee-deep creeks), deep erosion ditches, or the steep windward side of a ridge completely out of sight and downwind of the feeding corridor. Arrive in your tree 75 to 90 minutes before legal sunrise—well before deer begin meandering back toward their daytime beds.
Variations: Adapting to Terrain & Property Constraints
Variation 1: Flat Agricultural & Marsh Terrain (Zero Elevation Contours)
When topo maps show fewer than 10 feet of elevation change across an entire section, deer cannot use hill thermals or military crests for predator detection. Instead, water and stem density replace elevation.
- How to Adapt: Switch entirely to high-resolution satellite layers and look for subtle 1-to-3-foot elevation humps inside wet marshes, cattail sloughs, and flooded CRP grass. Mature bucks bed on the dry root systems of single willow trees, muskrat huts, or old beaver dams where wading predators create loud splashing noises. Use Step 6 (Long-Range Glassing) from elevated roadbeds or observation stands, and wear chest waders to access perimeter trees along waterways.
Variation 2: High-Pressure Public Land (In-Season Blind Entry)
If you draw a tag or travel to an unfamiliar public tract in October or November with zero spring scouting data, you cannot execute Phase 2 or wait weeks for trail camera data.
- How to Adapt: Execute Step 1 and Step 2 the night before, filtering specifically for human pressure buffers—locations at least 0.75 miles from parking trailheads or separated by a physical barrier (a hip-deep creek requiring waders, a steep 200-foot bluff, or a dense 10-acre multiflora rose thicket). Walk in slowly at 11:00 AM with a mobile hang-and-hunt stand on your back, carrying milkweed. Stay along the downwind perimeter of the suspected thicket until you intersect fresh shiny droppings, shredded thigh-high rubs, and torn green browse (Step 5). Stop immediately at that transition line, set up 60 yards downwind, and hunt that afternoon.
Variation 3: Western Mule Deer & Open Sagebrush Country
Unlike eastern whitetails that bury themselves inside dense horizontal stem cover, western mule deer rely on long-range vision and broken rimrock shade.
- How to Adapt: Prioritize Step 6 (Long-Distance Glassing) from 800 to 2,000+ yards away using a 20–60x spotting scope at first light. Mule deer bucks bed just below rimrock ledges, inside quaking aspen dark-timber patches, or on the shaded leeward shelves of sagebrush coulees where they can watch half a mile of open country below while keeping uphill thermals or ridge winds at their backs. Because mule deer frequently change exact bed spots along a ridge as the sun shifts shade angles midday, stay on the glass until they settle into their mid-morning bed (9:30 AM–11:00 AM) before planning a wind-safe stalk.
Time and Cost Breakdown
| Budget Tier | Total Cost | Time Investment | Recommended Gear & Workflow |
| Zero-Budget DIY Tracker | $0 – $5 | 12–16 hours | Free Google Earth / USGS Topo layers + winter snow backtracking + Feb–April boot recon + wild milkweed pods. Highest certainty, highest physical effort. |
| Mid-Tier Mobile Hunter | $250 – $450 | 8–12 hours | onX Hunt Elite ($100/yr) + 10×42 roof-prism binoculars ($150) + 1–2 non-cellular SD trail cameras ($100–$150) + spring ground scouting. |
| Time-Crunched Property Manager | $800 – $2,000+ | 4–6 hours | HuntWise Pro ($100/yr) + 4 cellular trail cameras with solar panels ($600 + $40/mo data) + HD spotting scope/tripod ($600–$1,200+). Minimizes foot time via remote digital monitoring. |
Frequently Asked Questions (FAQ)
Do deer sleep in the exact same bed every single day?
No. While a mature buck maintains a core home sanctuary, he rotates among 3 to 8 different primary beds depending on exact wind direction, temperature, and precipitation. A buck will use an east-facing ridge point strictly on west winds and shift 200 yards to a west-facing point when the wind switches east.
How can I tell the difference between a daytime bed and a nighttime bed?
Daytime beds prioritize predator defense and feature a solid rear backboard (a tree trunk, rock ledge, or blowdown), heavy overhead or side brush cover, and a strategic downwind view. Nighttime beds are located right out in open feeding areas—such as alfalfa fields, oak flats, or clearings—with zero overhead cover or wind protection.
What time of day do deer enter and leave their bedding areas?
Outside the November rut, mature bucks typically enter their daytime beds 30 to 45 minutes before legal sunrise and remain bedded for 8 to 10 hours, standing briefly every 3 to 4 hours to stretch, urinate, and chew cud within 15 yards of the bed. They leave the bed 30 to 60 minutes before sunset.
How close can I get to a deer bedding area without spooking them?
In dense summer/early-autumn foliage or noisy marsh terrain with a steady 10–15 mph wind in your face, you can set up within 50 to 75 yards of a bed undetected. In quiet, leafless late-season hardwoods with calm winds under 5 mph, stay 100 to 150 yards back along the exit trail to avoid crunching frozen leaves.
Why are there buck rubs right inside a bedding area?
Rubs located within 15 yards of a bed are territorial signpost rubs made primarily under the cover of darkness when the buck returns to his sanctuary before dawn, or when he stretches midday. They mark dominance for other bucks passing through and confirm that a buck—rather than a doe—occupies that specific bed.
Mastering how to find bedding areas transforms deer hunting from random luck into a repeatable geometric equation. By combining upper-third topographic e-scouting with off-season bed forensics, perimeter trail cameras, and disciplined thermal testing, you can map every daytime sanctuary on your hunting property and intercept mature deer on their feet during legal daylight.