
Learning how to use wind direction when hunting requires executing a 7-step scent-management sequence: map macro forecasts, plot a downwind access route, test trailhead micro-currents, track long-range eddies with milkweed, position at a 30-to-45-degree crosswind angle, monitor 20-minute thermal shifts, and calculate ballistic windage. Expect 15 minutes of prep and continuous field checks. Beginner-friendly, your success depends entirely on disciplining yourself to abandon setups when swirling thermals contaminate your target zone.
Before You Start: Prerequisites & Gear Checklist
- Time Required: 15 minutes pre-hunt mapping; 30 seconds every 15–30 minutes during the hunt.
- Difficulty Level: Beginner to Intermediate.
- Typical Cost: $0 (using natural milkweed and free weather apps) to $150+ (adding a ballistic anemometer and electronic vapor tool).
- Prerequisite Skills: Ability to read a topographic map (identifying ridges, saddles, and drainages) and basic compass azimuth navigation ($0^\circ\text{–}360^\circ$).
Required Tools & Materials Checklist:
- [ ] GPS Hunting App: OnX Hunt or HuntStand ($0 free tier to $30–$40/year) with offline topographic maps downloaded for your hunting unit.
- [ ] Long-Range Floater (Choose 1): 1 coin purse or pill bottle stuffed with 20–30 dried milkweed pods (seeds stripped off the silk coma; $0) OR 1 electronic smoke/vapor wind indicator ($30–$60) or scent-free smoke stick kit ($10–$20).
- [ ] Micro-Draft Indicator: 1 unscented talc or marble-dust powder squeeze bottle ($5–$12) OR 1 piece of 6-inch unweighted sewing thread/ surveyor’s ribbon tied to your bow stabilizer or rifle barrel ($0).
- [ ] Ballistic Wind Meter (Optional — Rifle Hunters Only): 1 handheld impeller anemometer such as a Kestrel 2700 or 5700 ($30–$150+).
Phase 1: Pre-Hunt Digital Mapping and Stand Selection
Step 1: Map Your Macro Scent Cone on a Topographic App
Plot the hourly prevailing wind vector over your target hunting area using a digital mapping app 12 hours before your hunt, and verify it 1 hour before departure.
Open OnX Hunt (Wind & Weather tab) or HuntStand (HuntZone tool) and drop a pin on your exact tree stand, ground blind, or glassing knob. Read the meteorological cardinal direction carefully: weather forecasts always name the direction the wind blows from, not where it is going. A forecasted 8 mph Northwest ($315^\circ$) wind blows from the northwest and pushes your scent cone directly toward the Southeast ($135^\circ$). Check the hourly wind speed alongside direction:
- 1–3 mph: Unstable; local topography and solar thermals will easily override the forecasted direction.
- 4–12 mph: Ideal; steady directional flow that suppresses erratic thermal swirling.
- 15+ mph: High turbulence; causes severe swirling eddies on the downwind side of timber edges and ridges.
You’ll know it worked when: Your app’s visual scent-cone overlay points completely clear of known bedding areas, feeding fields, and primary staging trails for the entire 4-hour window of your planned sit.
Common Mistake: Confusing wind origin with scent destination. If deer approach your stand from the south, sitting in a “South wind” means the wind blows from the south, hits your back, and blows safely north. However, if deer approach from the north during a South wind, your scent blows straight into their nostrils. Never hunt a prime stand on a marginal wind—stay home or move to a backup site rather than educating mature game for the rest of the season.
Step 2: Plot a Downwind Access and Exit Route
Draw a breadcrumb entry trail on your digital map that skirts the downwind perimeter of all bedding and feeding zones between your truck and your hunting spot.
Most beginners check the wind at the tree stand, but ruin the hunt during the 400-yard walk in. Your body sweats and sheds odor particles onto brush and grass with every step. Design an access route (such as a dry creek bottom, logging ditch, or leeward field edge) where your walking scent cone blows away from areas holding game, and never step across the trail you expect animals to walk down later.
You’ll know it worked when: Your mapped GPS walking line never intersects a suspected animal travel corridor and keeps your projected scent cone blowing into dead space (such as a paved road, deep canyon, or open water) from the moment you shut your truck door.
Phase 2: Field Verification and Tactical Positioning
Step 3: Verify Ground-Level Micro-Drafts at the Trailhead
Test the actual ground-level air current at your parking area before stepping into cover by releasing two short puffs from a powder wind checker or watching a 6-inch bow thread.
Hold the powder squeeze bottle at chest height, arm extended 24 inches away from your body, and squeeze sharply twice. Watch the white cloud of unscented talc or marble dust drift for 10 to 15 feet. Compare the drift direction against your compass or smartphone azimuth and your Step 1 forecast.
You’ll know it worked when: You confirm whether the local valley floor or timber edge is channeling the breeze differently than the regional weather station predicted, allowing you to adjust your entry path before making noise.
Common Mistake: Relying solely on dry leaves or grass tossed in the air. Crushed leaves are too heavy; they drop to the ground in 2 seconds and completely miss sub-2 mph thermal currents that carry human odor straight to a buck’s nose.
Step 4: Track Long-Range Currents and Thermal Direction
Release a stripped milkweed silk or a 3-second stream of scent-free vapor upon reaching your hunting zone to map the true path of your scent out to 100+ yards.
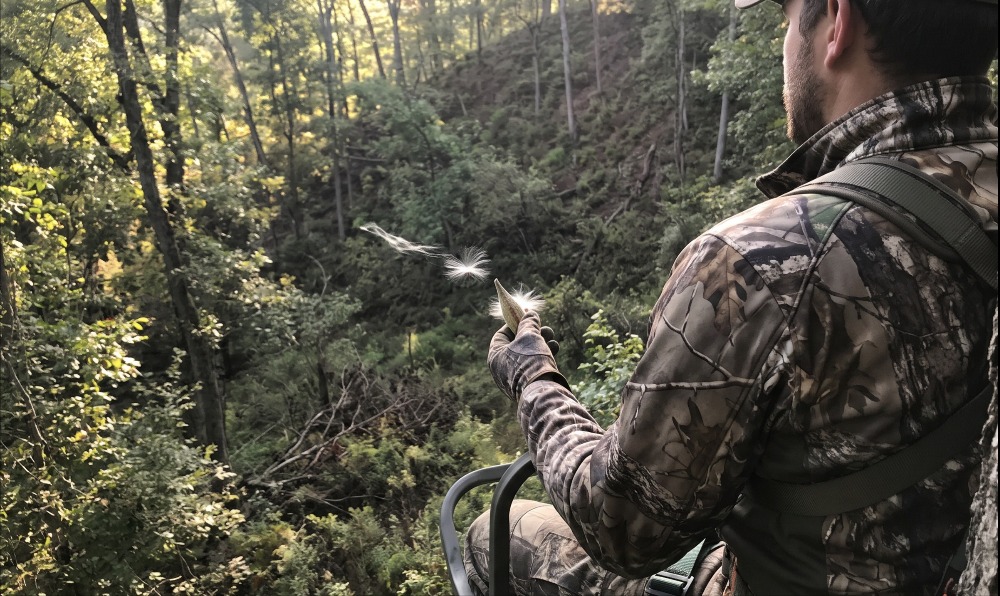
Powder bottles only show wind for 10–15 feet before dissipating. To see what happens to your scent where the animals actually walk, pinch a single tuft of milkweed silk, snap off the brown seed pod (leaving only the weightless white fibers), and release it into the air. Watch the fiber for 30 to 60 seconds through your binoculars.
Pay strict attention to vertical movement (thermals) as well as horizontal drift:
- Rising Thermals (Morning): Beginning 30 to 60 minutes after sunrise, solar radiation warms the soil by $2^\circ\text{F}\text{–}4^\circ\text{F}$ above ambient air temperature. Warm air expands and rises uphill. Hunt high on ridges in the morning so your scent rises into the canopy and over the ridge crest.
- Falling Thermals (Evening): Beginning 45 to 60 minutes before sunset (or immediately when a hillside falls into afternoon shade), air cools, becomes dense, and drains downhill like water into creek bottoms. Hunt low in drainages in the evening so your scent pools below approaching animals.
You’ll know it worked when: You watch the milkweed silk float at least 50 to 100 yards past your shooting lane without dropping into a drainage, hitting a tree line and curling backward, or drifting into the target trail.
Step 5: Lock In a 30-to-45-Degree Quartering Crosswind Position
Position your tree stand, ground blind, or stalking path so the wind blows at a $30^\circ\text{ to }45^\circ$ angle off the animal’s expected line of travel—known as a “just-off” wind.
Beginners try to set up $180^\circ$ dead-downwind of the animal. In practice, setting up directly downwind places you directly on top of the trail the animal is walking toward, forcing a head-on silhouette where the animal spots your movement, or crosses your ground-entry tracks upwind. Instead, offset yourself 20 to 35 yards to the downwind side of the trail so the breeze hits the side of your cheek and carries your scent cone into an empty quadrant behind the animal’s flank.
         [EXPECTED ANIMAL PATH]
                   |
                   |  (Animal walks North -> South)
                   v
    [SHOOTING ZONE / KILL WINDOW]
         /                   \
        /  20-35 yds          \  Prevailing Wind (NW -> SE)
       /                       v
  [HUNTER POSITION] -----> [SCENT CONE] (Blows safely into dead zone
                             at 30°-45° angle behind the trail)
You’ll know it worked when: You can draw a straight line from your setup to the expected shot location, and your milkweed floater drifts at a sharp diagonal away from that line, leaving a 30-yard scent-free buffer around the kill zone.
Common Mistake: Setting up on the upper-third leeward (downwind) side of a steep ridge during winds over 7 mph. As wind crests a sharp ridge, it separates from the ground and curls backward into a vertical circular vacuum (a leeward eddy). While the prevailing wind blows downhill, the bottom of the eddy sucks your scent uphill into the prevailing wind, contaminating both sides of the mountain. Set up either on the true military crest or 100+ yards below the leeward drop-off.
Phase 3: Active Hunt Monitoring and Shot Execution
Step 6: Execute the 20-Minute Wind Surveillance Loop
Deploy a wind checker or milkweed floater every 15 to 30 minutes throughout your sit, and immediately every time sunlight hits or leaves your slope.
Wind is never static. Passing weather fronts, cloud cover, and shifting sun angles alter ground currents constantly. Keep your powder bottle or milkweed pouch in an outer chest pocket or clipped to your bino harness so you can trigger it with one hand and zero fabric noise. During the final hour of daylight, decrease your check interval to every 10 minutes to catch the exact moment rising daytime thermals stall and reverse into falling evening thermals.
You’ll know it worked when: You detect a thermal switch or 40-degree wind shift within 15 minutes of its onset, allowing you to quietly pack down and relocate before an incoming animal hits your drifting scent stream 200 yards away.
Step 7: Measure Exact Wind Speed for Long-Range Ballistic Compensation
Hold an electronic impeller anemometer (such as a Kestrel) into the breeze at shooting height to capture exact wind velocity and crosswind angle before taking any rifle shot beyond 250 yards.
For close-range bowhunters, wind is purely about scent; for western and open-country rifle hunters, wind also pushes the bullet off target. Turn on your handheld wind meter, point the open impeller housing directly into the wind for 5 seconds to record average and peak speed in mph, and determine the wind angle relative to your barrel:
- Full Value Wind ($75^\circ\text{–}105^\circ$ perpendicular to bullet path): Apply $100\%$ of your ballistic chart’s windage correction.
- Three-Quarter Value Wind ($45^\circ$ diagonal to bullet path): Apply $75\%$ of your windage correction.
- Half Value Wind ($30^\circ$ shallow angle to bullet path): Apply $50\%$ of your windage correction.
You’ll know it worked when: Your ballistic solver or turret adjustment accounts for both the real-time mph reading at your muzzle and the directional indicator cues (mirage wave angle or moving vegetation) downrange at the target.
Common Mistakes and How to Fix Them
1. Getting Trapped in the Morning/Evening Thermal Switch
- The Failure Mode: You climb into a mid-slope tree stand at 5:30 AM. The dark, cold air carries your scent safely downhill into a dry creek. At 7:45 AM, the sun warms the east-facing hillside, the air stalls, and your milkweed suddenly floats straight uphill into the buck’s bedding thicket.
- How to Fix It: Before sunrise, hunt below bedding areas only if you plan to exit before solar warming begins, or climb above the bedding elevation before first light so rising morning thermals carry your scent into the upper atmosphere all morning.
2. Trusting Powder Bottles in Thick Timber Eddies
- The Failure Mode: You squeeze a talc bottle in a timber bottom; the white puff drifts 10 feet to the north and disappears. You assume you are safe, but 40 yards away, your scent hits a dense wall of conifers, bounces backward, and swirls south into the deer trail.
- How to Fix It: Switch to stripped milkweed silk or an electronic continuous vaporizer when hunting timber pockets or creek bottoms. Watch the indicator until it vanishes past your maximum shooting distance (40+ yards for bow, 150+ yards for rifle).
3. Blowing out the Bedding Area During Stalk Adjustments
- The Failure Mode: While spot-and-stalk hunting, the wind shifts onto the back of your neck. You try to circle the herd by cutting tightly across the hillside, accidentally walking through their line of sight or snapping dry timber inside 150 yards.
- How to Fix It: Back out the exact way you came for at least 200 yards until you are completely out of sight and hearing range. Use terrain masking (dropping behind a spine or into a coulee) to loop wide until the wind hits your nose or cheek again before closing the distance.
4. Relying on Cover Scents or Ozone Generators to Beat a Bad Wind
- The Failure Mode: The wind is blowing directly from your stand toward the food plot, bit you hunt it anyway because you sprayed down with enzyme eliminators, wore carbon clothing, and hung an ozone unit above your head. The first mature doe hits your downwind stream at 80 yards, blows violently, and bolts.
- How to Fix It: Treat scent-control technology as a secondary buffer for rogue thermal swirls—never as a license to ignore wind direction. A deer possesses roughly 297 million olfactory receptors (compared to a human’s 5 million); no spray eliminates your pulmonary breath plume. Always physically relocate to the downwind side.
5. Misreading Canyon Venturi Funneling
- The Failure Mode: Your weather app predicts a mild 5 mph West wind, so you set up in a narrow mountain saddle. When you arrive, the wind is screaming through the gap at 20 mph and swirling violently around the rock outcroppings.
- How to Fix It: Recognize the Venturi Effect—when broad air masses are forced through a narrow topographical constriction (a saddle, pinch point, or canyon mouth), wind speed accelerates by $50\%\text{ to }100\%$ and creates chaotic side-eddies. Set up 50–75 yards upwind of the narrowest throat of the saddle where airflow remains laminar and predictable.
Tactical Variations by Hunting Style and Terrain
Bowhunting in Whitetail Timber (Elevated Stands & Saddles)
- Key Adjustment: Elevate your platform to 18–24 feet and angle your setup to exploit the thermal tunnel.
- Execution: In thick deciduous timber, canopy friction slows macro winds by up to $60\%$, making thermal currents dominant. Climbing to 20 feet puts your base scent stream higher off the forest floor, buying you an extra 30–50 yards of horizontal travel before falling evening thermals pull your odor down to deer nose level (36 inches off the ground). Always tether a pouch of milkweed to your tree strap at chest height for one-handed checks.
Western Spot-and-Stalk in Mountain Terrain
- Key Adjustment: Synchronize your vertical stalking elevation with the daily solar thermal cycle and monitor ridge-crest wind shear.
- Execution: Hunt from the bottom up in the evening (when falling thermals blow down into your face) and from the top down in the morning (when rising thermals blow up into your face). If stalking across a shaded north-facing aspect while the adjacent south-facing aspect is in bright sun, expect cross-canyon drafts: air will sink down the cold shaded slope and get sucked up the warm sunny slope simultaneously. Keep a powder bottle clipped to your bino harness shoulder strap to check the breeze every 50 yards of movement.
Long-Range Rifle Hunting in Open Prairie or Agricultural Fields
- Key Adjustment: Prioritize continuous anemometer monitoring and downrange mirage reading over close-range milkweed checks.
- Execution: With no trees to break the flow, wind speed doubles between prone ground level (12 inches high) and 6 feet off the ground due to surface friction. Stand up to take your Kestrel reading so you measure the wind speed the bullet will actually pass through at the apex of its arc. Use your spotting scope to watch heat mirage boiling off the dirt at mid-range to verify the wind hasn’t reversed direction across a coulee between you and the target.
Tool Comparison: Cost vs. Field Performance
| Wind Tool Category | Upfront Cost | Recurring Cost | Effective Range | Primary Advantage | Best Hunting Application |
| Natural Indicators (Milkweed / Thread) | $0 | $0 | 1 inch (thread) to 150+ yards (milkweed) | Milkweed rides vertical thermals and reveals distant eddies silently | Tree stand, saddle, and spot-and-stalk bowhunting |
| Powder Squeeze Bottles | $5–$12 | $5–$12 per season | 10–15 feet | Instant one-handed deployment for micro-drafts in thick brush | Still-hunting and fast-moving ground stalks |
| Smoke Sticks & Vapor Units | $10–$60 | $10–$25 (refills/sticks) | 20–50 yards | Continuous visual stream shows exact air-column behavior | Stationary blinds and tree stand thermal monitoring |
| Digital Hunting Apps (OnX / HuntStand) | $0–$40/yr | $30–$40/yr subscription | Macro regional (miles) | Predicts hourly wind shifts and overlays visual scent cones | Pre-hunt stand selection and access-route planning |
| Electronic Wind Meters (Kestrel) | $30–$150+ | $2 battery every 2 yrs | Exact location (0 feet) | Measures exact mph, knots, azimuth, temp, and ballistic drift | Long-range western rifle and open-country hunting |
Frequently Asked Questions
Does hunting in the rain eliminate my scent cone?
No, light-to-moderate rain actually intensifies scent detection. Moisture increases relative humidity (above $70\%$) and traps odor molecules close to the ground rather than letting them dissipate into dry air, while wet vegetation holds skin and boot bacteria longer. Only a heavy downpour washes airborne scent particles straight into the soil.
What is the best wind speed for deer and elk hunting?
A steady wind between 5 and 10 mph is ideal for big game hunting. Below 3 mph, wind lacks directional stability and swirls unpredictably with every minor temperature shift. Above 15 mph, heavy canopy movement creates visual noise and violent leeward eddies that make scent paths impossible to control.
How far away can a deer or elk smell a hunter downwind?
Under steady 5–10 mph wind conditions with moderate humidity ($50\%\text{–}70\%$), a whitetail deer or elk can reliably detect human odor from 300 to 600 yards directly downwind. In open country with laminar airflow, elk regularly scent-check hunters from over half a mile (880+ yards) away.
Where and when do I harvest milkweed pods for hunting?
Harvest common milkweed (Asclepias syriaca) in late September through October along sunny roadsides, ditch banks, and agricultural field edges just before the green pods split open naturally. Pick firm pods, let them dry in a warm garage for 7 days, strip out the brown seeds, and pack the white silk into a slotted coin purse.
Should I hunt with the wind in my face or at my back?
Always hunt with the wind blowing into your face or across your cheek ($30^\circ\text{–}45^\circ$ quartering angle) relative to where you expect animals to appear. If the wind hits the back of your neck, your breath and body odor are blowing straight ahead into your viewing and shooting zone.
Mastering how to use wind direction when hunting transforms luck into repeatable field craft. By pairing pre-hunt digital scent-cone mapping with disciplined milkweed float checks and a 30-to-45-degree crosswind offset, you stay undetectable inside a game animal’s primary defense perimeter and guarantee clean, unpressured shot opportunities all season.