
Learning how to find feeding areas requires filtering broad landscapes through a strict three-phase funnel: desktop satellite mapping, long-distance optical glassing, and wind-conscious physical sign verification before hanging a single trail camera. Completing this seven-step process takes 6 to 12 hours over one weekend, requires beginner-to-intermediate woodsmanship, and succeeds or fails based on one critical factor: scent discipline during physical verification.
Before You Start: Scouting Prerequisites & Gear
- Time Required: 1–2 hours (Desktop E-Scouting) + 4–10 hours (Field Verification & Camera Setup)
- Difficulty Level: Intermediate (requires map reading, basic plant identification, and wind monitoring)
- Typical Cost Range: $0 (using free maps and physical boot leather) to $300–$2,500+ (when adding premium mapping apps, cellular cameras, and high-definition optics)
Tools & Materials Checklist
- Digital Mapping Platform (1): Basic free satellite maps (Google Earth) or a subscription hunting app ($30–$50/year for onX Hunt, HuntStand, or Spartan Forge).
- Binoculars (1 Pair): 8x42mm for timber/whitetail or 10x42mm/12x50mm for western open country ($150–$300 entry-level like Vortex Diamondback HD; $1,000–$2,500+ for Swarovski EL/NL Pure or Leica Noctivid).
- Wind Checker (1): A squeeze bottle of unscented talcum powder or a pouch of dried milkweed silk pods.
- Trail Cameras (2–4): Standard SD card cameras ($30–$60 like GardePro or Bushnell) or cellular models ($70–$150+ like Tactacam Reveal X or Moultrie Edge, plus $5–$15/month data plans).
- SD Cards & Batteries (Per Camera): Class 10, U1/U3 16GB–32GB SD cards and 8–12 AA Energizer Ultimate Lithium batteries (alkaline batteries lose voltage below 32°F/0°C).
- Pruning Shears (1 Pair): Pocket bypass pruners for clearing camera lenses without snapping twigs by hand.
- Scent-Free Rubber Boots (1 Pair): Knee-high, 16-inch vulcanized rubber or neoprene boots to contain human skin-cell shedding on ground vegetation.
Prerequisite Conditions
- Seasonal Timing: Identify the current nutritional phase before looking at a map. Early season (September–October) requires protein and soft/hard mast (soybeans, clover, white oak acorns, persimmons); mid-to-late season (November–January) shifts heavily toward high-carbohydrate energy sources (standing corn, sugar beets, brassica bulbs, and woody browse).
- Legal Access: Verify property boundaries and public land hunting regulations before stepping off the road.
Phase 1: Desktop E-Scouting and Terrain Filtering
Never walk blindly into the timber. Desktop scouting eliminates 80% of unproductive water and dead timber from home, ensuring your boots only touch high-probability ground.
Step 1: Mark Vegetation Transitions on Satellite Maps
Pinpoint and drop digital waypoints on every intersection where dense security cover meets open agricultural fields, regenerating clear-cuts, or mast-producing hardwood stands.
Open your mapping platform (onX Hunt, HuntStand, or Spartan Forge) and enable the Hybrid (Satellite + Topo) base layer. Look for edge habitat—wildlife are edge creatures that rarely feed more than 50 to 100 yards from thick escape cover during daylight.
To distinguish tree species from aerial imagery, toggle between the Leaf-Off (Winter/Early Spring) and Leaf-On (Summer/Fall) satellite layers if your app supports historical imagery (Google Earth Desktop offers a free historical timeline slider):
- Conifers/Bedding Cover (Pines, Cedars, Spruce): Appear dark hunter-green in both summer and winter layers with a sharp, pointed, fine-grain canopy texture.
- Hardwoods/Mast Zones (Oaks, Beech, Hickory): Appear bright green with a billowy, “broccoli-crown” canopy texture in summer, turning gray/brown with visible forest floors in winter layers.
- Regenerating Clear-Cuts (1 to 7 years old): Appear as jagged geometric patches inside mature timber with low, scrubby brush and logging road skid trails. These provide up to 2,000 pounds of accessible woody browse and blackberry soft mast per acre, compared to less than 100 pounds per acre under a shaded mature forest canopy.
Drop a color-coded waypoint (e.g., Green Food Icon) on inside corners of agricultural fields (where timber juts out into the crop, offering animals a two-sided escape route) and along transitions between dark-green conifer swamps and open hardwood ridges.
- Success Checkpoint: You’ll know it worked when you have narrowed a 500-acre tract down to 3 to 5 specific edge pins, each no larger than a 2-acre football field, located where two distinct plant communities meet.
- Common Mistake: Trusting outdated satellite crop imagery. Satellite tiles are often 1 to 3 years old—a green soybean field on your screen may be fallow dirt or rotated into cotton this year. Treat agricultural pins as hypotheses until verified in Phase 2.
Step 2: Overlay Topographic Funnels Between Bedding and Food
Trace the terrain contours between suspect bedding cover and your Step 1 food pins to locate natural elevation pinch points where game must travel.
Turn on your map’s Topographic Contour Layer (typically set at 10-foot, 20-foot, or 40-foot elevation intervals) and the Slope Angle Shading layer if available. Animals conserve calories by traveling the path of least resistance while using terrain to hide their silhouette:
- Saddles: Low dips along the spine of a steep ridge (looks like an hourglass between two concentric hilltop circles on a topo map). Game cross ridges through saddles to move from north/east-facing bedding slopes to south/west-facing oak flats.
- Benches: Flat shelves running horizontally along a steep hillside (indicated by widely spaced contour lines sandwiched between tightly packed contour lines).
- Creek Crossings & Ditch Pinch Points: Steep-banked erosion gullies or deep creeks force animals to funnel through narrow, shallow washouts within 100 yards of field edges.
Draw a digital line connecting the nearest thick bedding cover (north-facing conifer slopes, cattail marshes, or leeward ridges) to your Step 1 food waypoints. Drop a secondary waypoint (Yellow Funnel Icon) wherever a saddle, bench, or ditch crossing intersects that line within 150 yards of the food edge.
- Success Checkpoint: You’ll know it worked when every food waypoint on your map is paired with at least one terrain-feature entry funnel connecting it to dense security cover within 200 to 400 yards.
- Common Mistake: Ignoring elevation scale in flatland terrain. In river bottoms or agricultural flatlands where 20-foot contour lines don’t exist, switch on the LiDAR / High-Resolution Elevation Shading layer (standard in Spartan Forge and onX Elite) to reveal 2-to-4-foot elevation rises; in swamps, a dry strip just 24 inches above the water table acts as the primary highway into feeding zones.
Phase 2: Low-Impact Field Verification
Once your digital map holds 3 to 5 high-probability locations, transition to the field. Execute these steps in strict order—observation from afar always precedes physical entry.
Step 3: Glass Open Transitions from Downwind Vantage Points
Observe open fields, clear-cuts, and powerlines from 200 to 800 yards away using binoculars during the final 60 minutes of daylight to confirm active feeding without leaving ground scent.
Arrive at a high vantage point, field access road, or downwind observation tree at least 90 minutes before legal sunset (or 30 minutes before legal sunrise). Check your wind direction using a milkweed pod or powder puff; your scent stream must blow away from both the feeding area and the suspected bedding approach trails.
Mount your 8x42mm or 10x42mm binoculars on a tripod or window mount (resting binoculars on a stable surface increases your ability to detect subtle ear flicks inside brush by over 50% compared to free-hand holding). Scan the first 20 yards inside the timber shadow along the field edge rather than the center of the open field. Mature animals often stage inside the woodline for 20 to 30 minutes, browsing acorns or honeysuckle before stepping into open crops during the last 15 minutes of legal light.
When an animal appears, do not just look at the animal:
- Drop a waypoint on your phone map marking the exact bush or fence post where it stepped out.
- Watch its mouth through your optics to identify whether it is grazing low forbs/clover (head down, continuous slow walking) or targeting a specific tree/shrub (head bobbing, stationary chewing).
- Success Checkpoint: You’ll know it worked when you visually log wildlife entering a specific 30-yard perimeter along a transition edge while remaining completely undetected.
- Common Mistake: Skylining yourself on a ridge crest orslamming truck doors within 400 yards of an agricultural field at dusk. Always stop your vehicle out of sight behind terrain breaks and approach your glassing knob keeping background foliage behind your shoulders.
Step 4: Inspect Canopy Mast Using Midday Rising Thermals
Walk into timbered feeding zones between 10:00 AM and 2:00 PM on sunny days to verify acorn, beechnut, or fruit drop in the tree canopy using binoculars.
When hunting thick timber, swamps, or closed-canopy ridges where Step 3 long-range glassing is impossible, you must walk the ground. Never scout feeding areas at dawn or dusk, when animals are actively feeding there. Enter between 10:00 AM and 2:00 PM when wildlife have retreated to bedding areas and solar heating causes thermal air currents to rise uphill, pulling your scent up toward the canopy rather than pooling it in low bottoms.
Walk directly to your Step 1 hardwood waypoints. Look up into the upper third of the oak canopies (where branches receive direct sunlight) using your binoculars:
- Identify White Oak Group (Quercus alba, Quercus macrocarpa, Chestnut Oak): Leaves have rounded lobes with no bristle tips; bark is light ash-gray and flaky. White oak acorns mature in 1 year, contain low tannic acid (sweeter taste), and drop first (typically mid-September through October). Animals will abandon all other foods to eat falling white oak acorns.
- Identify Red Oak Group (Quercus rubra, Pin Oak, Black Oak): Leaves have pointed, bristle-tipped lobes; bark is darker with flat, shiny “ski-track” ridges down the trunk. Red oak acorns take 2 years to mature, are high in bitter tannins, and serve as vital secondary food from late October through January after white oaks are depleted or rot.
- Identify Soft Mast (Persimmons, Crabapples, Blackberries, Pokeweed): Check forest openings and south-facing edges for low-hanging orange/purple fruit or thorny cane thickets.
Scan the tips of the outer branches through your 8x42mm binoculars to spot clusters of green or brown caps. Next, examine the ground directly beneath the outer drip-line of the tree crown (not against the trunk).
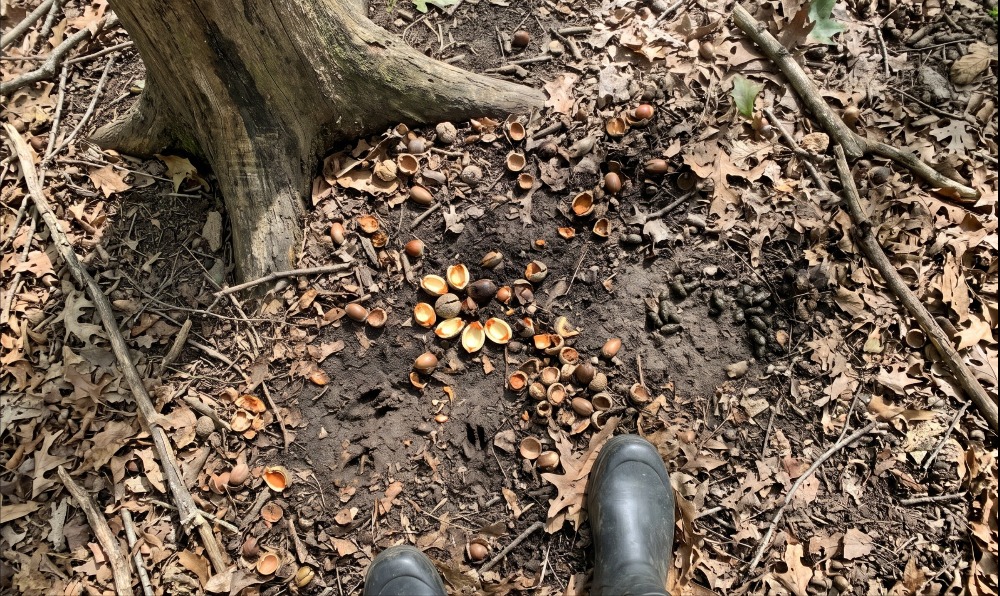
- Success Checkpoint: You’ll know it worked when you find a “feed tree”—a single oak or fruit tree dropping heavy mast where you can see freshly cracked acorn hulls (bright cream/orange interiors, not weathered gray/black), half-eaten caps, and leaves kicked aside in 12-to-24-inch bare dirt patches.
- Common Mistake: Assuming every oak grove has acorns. Only about 20% to 30% of mature oaks produce a heavy crop in any given year due to late spring frosts and mast cycles. Finding five acres of white oaks means nothing until your binoculars confirm nuts on the limbs or fresh hulls on the dirt.
Step 5: Read Fresh Browse Lines, Tracks, and Droppings
Confirm that game fed at the spot within the last 12 to 24 hours by testing dropping moisture, track edge sharpness, and stem bite geometry.
Drop to one knee under your candidate feed tree or along the clear-cut transition edge to separate historical sign (last week or last month) from hot sign (last night):
- Test the Droppings (Scat): Press the tip of your boot or a stick onto a pellet pile.
- Less than 12 hours old: Dark black/brown exterior with a shiny mucus glaze; compresses easily under light pressure; breaking a pellet reveals a bright olive-green, moist interior. Clumped or softer pellets indicate high-moisture green browse/soft mast; hard individual pellets indicate woody browse or dry acorns.
- More than 48 hours old: Dull matte gray/black crust, hard to crush, dry brown center, or showing white fungal threads. Walk away—the food source has gone cold.
- Examine the Browse Line (48 inches and below): Inspect greenbriar (Smilax), maple seedlings, blackberry canes, and honeysuckle stems between knee and chest height (18 to 54 inches).
- Deer/Elk Browse: Ungulates lack upper front incisors; they pinch and rip stems with their lower teeth and hard upper palate, leaving a ragged, shredded, fibrous stem tip. Fresh bites within 24 hours have pale green/white moist wood fibers; bites older than 3 days oxidize into brown, dried splits.
- Rabbit/Rodent False Sign: If the stem is sliced cleanly at a sharp 45-degree knife-like angle, that was made by a rabbit’s sharp upper and lower incisors—do not hunt over it.
- Read Track Sharpness: Look at tracks in bare dirt or mud where trails enter the feeding zone. A track made last night has crisp, unbroken dirt walls and tiny crumbs of soil balanced on the rim that haven’t been flattened by morning dew or wind.
- Success Checkpoint: You’ll know it worked when you locate a converging trail network featuring sharp-edged tracks, ragged green stem tips, and soft, olive-centered droppings within a 15-yard radius of the food source.
- Common Mistake: Confusing squirrel or turkey scratching with deer feeding under oaks. Squirrels leave neatly chewed shells with parallel tooth grooves and sit on stumps/logs to shuck nuts, piling shells in one spot. Turkeys scratch V-shaped wedges in the leaves (12 to 18 inches wide). Deer and elk leave crushed, irregular hull fragments scattered alongside cloven hoof impressions and pellet piles.
Phase 3: Pattern Confirmation and Access Setup
Finding food tells you where game want to be; confirming when they arrive ensures you don’t waste sits watching empty woods after animals have only fed at 2:00 AM.
Step 6: Mount Trail Cameras at a 45-Degree Offset to Trails
Strap a cellular or SD trail camera 36 to 42 inches off the ground, angled 45 degrees down the primary entry trail 15 to 25 yards back from the open feeding area.
Do not mount a camera facing directly into an open crop field or perpendicular (90 degrees) to a narrow game trail. Open-field cameras trigger falsely hundreds of times per day from wind-blown grass, while 90-degree trail cameras capture blurred hindquarters because the animal passes through the Passive Infrared (PIR) detection cone before the 0.3-to-0.5-second trigger fires.
Follow this exact mounting protocol:
- Select the Tree: Pick a sturdy tree 12 to 18 inches in diameter (thin saplings sway in 10 mph winds, causing false triggers) located along the Step 2 entry funnel, 15 to 25 yards inside the timber edge.
- Orient the Lens: Point the camera North or South whenever possible. East- and West-facing lenses get blinded by direct sunrise and sunset glare during the exact golden hours game move.
- Set Height and Angle:
- Standard setup: Strap the camera at 36 to 42 inches (belt-to-chest height) aimed at a 45-degree angle down the trail so animals walk toward or away from the lens, remaining inside the 60-foot flash and PIR zone for 4 to 6 seconds.
- Public land / high-pressure setup: Mount the camera at 72 to 84 inches (6 to 7 feet high) using an adjustable screw-in bracket or stick wedge angled downward at 15 to 20 degrees toward the spot 20 feet away. This keeps the camera above both human eye level and a mature animal’s line of sight.
- Clear the Detection Zone: Use your pocket pruners to clip every leaf, fern, and tall grass blade within 10 feet of the lens. One weed waving 3 feet in front of a PIR sensor on a sunny afternoon will drain a lithium battery set in 48 hours.
- Configure Settings: Set the camera to 2-Photo or 3-Photo Burst Mode with a 15-to-30-second recovery delay along trails, or a 1-to-5-minute delay if pointed directly over a localized feed tree or scrape. Use Low-Glow (850nm) only if hidden high in timber; use No-Glow / Black Flash (940nm) for mature pressured animals.
- Success Checkpoint: You’ll know it worked when you walk down the trail at a normal pace 15 feet in front of the camera, verify the test indicator LED flashes (or receive an instant cellular test photo on your phone app), and see the trail centered horizontally across the frame from bottom-left to center-right.
- Common Mistake: Checking non-cellular SD card cameras every 2 to 3 days. Every time you walk to a feeding area to pull an SD card, you leave a 48-hour scent bomb. If using standard SD cameras, leave them undisturbed for at least 10 to 14 days, and only swap cards at midday during a rainstorm (which washes ground scent away within 30 minutes) or strong favorable wind.
Step 7: Map Clean Entry and Exit Routes Before Hunting
Plot a GPS track in your mapping app that lets you approach your ambush stand at dawn and leave at dark without crossing the animal’s feeding trail or blowing scent into the food plot.
Finding a hot feeding area is useless if you spook the animals in the dark while walking out after your first evening sit. Open your mapping app and review your Step 1 Food Pin, Step 2 Bedding Pin, and Step 6 Camera Pin:
- Determine the Predominant Wind: Check historical wind roses or a 7-day forecast (e.g., Windfinder or Spartan Forge) for the location.
- Plot the Approach Line (Blue Line): Draw a route from your parking spot to your stand/blind site that stays on the downwind side of the feeding trail and utilizes creek ditches, topography breaks, or thick timber shields to block visual line-of-sight from the open food source.
- Establish the Evening Exit Strategy: Hunting directly over an open agricultural field or large food plot in the evening traps you—at dark, animals are standing 30 yards from your tree, and climbing down blows them out of the county. Either set your stand 50 to 100 yards back inside the timber along the Step 2 staging funnel (where animals pass through at 4:45 PM, leaving the area clear under your tree by 5:30 PM dark), or arrange for a partner to drive a farm vehicle/UTV near the field edge if hunting private agricultural ground where wildlife are habituated to farm machinery.
- Success Checkpoint: You’ll know it worked when your mapped entry/exit line maintains at least a 100-yard buffer from known bedding areas and never crosses the ground trail animals use to enter the food source.
- Common Mistake: Walking down the edge of an agricultural field or logging road in the pre-dawn dark to reach a morning stand. Animals are still actively feeding in the field before dawn; your headlamp and boots on the field edge will bust them before legal shooting light even begins. Never hunt directly on a feeding source in the morning—hunt the pinch point back toward bedding instead.
Common Mistakes and How to Fix Them
Even experienced hunters misread feeding signs when conditions shift rapidly. Here are five realistic failure modes and how to recover your hunt:
1. The “Acorn Vacuum” Syndrome (Empty Crop Fields)
- The Symptom: You scouted a lush soybean field or clover plot in late August and saw 15 deer every evening. By September 25, your cameras go completely dead and the field is empty.
- Why It Happened: Two simultaneous triggers occurred: soybeans turned from green to yellowing/brown (losing palatability until the pods dry completely into hard brown beans), and the first white oaks inside the timber started dropping acorns.
- The Fix: Immediately abandon the field edge. Pull your camera 100 to 300 yards back into the adjacent hardwood ridges and execute Step 4. Find the specific white oaks dropping nuts; the animals haven’t left the property—they have simply shortened their evening commute by 200 yards.
2. Nocturnal-Only Trail Camera Photos
- The Symptom: Your trail camera over a feeding area captures dozens of photos of target animals, but every timestamp falls between 9:30 PM and 4:15 AM.
- Why It Happened: Either your camera placement contaminated the zone with human scent, or the feeding source is too far (400+ yards) from daytime bedding cover for mature animals to reach before legal shooting light ends.
- The Fix: Do not hunt that camera spot. Open your topo map (Step 2), measure 150 to 250 yards back along the trail toward the thickest bedding cover, and look for a secondary staging area (marked by heavy tree rubs, boundary scrapes, and light browse). Move your ambush setup to that staging zone to catch the animal during the last 20 minutes of legal daylight.
3. Hunting Yesterday’s Sign During a Cold Front
- The Symptom: You find torn-up ground under an oak tree on a 68°F (20°C) Tuesday, hang a stand, and see nothing when a 28°F (-2°C) cold front hits on Friday.
- Why It Happened: Drop in barometric pressure and freezing temperatures trigger an immediate metabolic demand for high-carbohydrate thermal energy (corn, brassica tubers, dry soybeans) over low-volume timber browse.
- The Fix: Match the food source to the thermometer. Hunt shaded timber mast and lush green clover when afternoon temperatures exceed 55°F (13°C); shift immediately to standing grains, brassica plots, or sunny south-facing clear-cuts whenever temperatures drop 15+ degrees below the seasonal average.
4. Blowing Out the Bedding Area While Scouting Timber
- The Symptom: While walking an oak ridge at midday (Step 4), you hear crashing brush and see white tails or elk bounding out of a thick blowdown 60 yards ahead.
- Why It Happened: You walked too close to a point-of-ridge or leeward shelf where animals bed within 100 yards of their primary food source, or your wind swirled in a thermal eddy.
- The Fix: Stop immediately—do not walk over to inspect the beds you just jumped them from. Back out along your exact entry footprints. Let the area rest completely for 5 to 7 days, or return the very next afternoon to set up 150 yards downwind along an adjacent ridge; mature animals often tolerate one midday intrusion as a passing hiker if you do not linger or leave scent inside their actual bed.
5. Misidentifying Nighttime Bedding Field-Centers as Entry Points
- The Symptom: You find flattened grass ovals and droppings in the middle of an alfalfa or cut cornfield and set up on the nearest fenceline, only to watch animals enter at the opposite corner 300 yards away.
- Why It Happened: Ungulates frequently bed down right in the center of open fields at 1:00 AM after filling their rumens to chew their cud safely away from timber predators (coyotes/wolves).
- The Fix: Ignore sign in the center of open fields. Walk the entire perimeter ditch or fenceline of the field during midday and find the exact gap where muddy hooves cross the ditch bank or hair is caught on the bottom barbed wire strand—that perimeter breach dictates where you set up.
Variations for Different Environments and Species
The core seven-step framework adapts across three distinct hunting scenarios:
1. Public Land Big Woods & Mountain Terrain (Zero Agriculture)
When scouting expansive national forests or mountain tracts with zero crop fields, Step 1 shifts entirely from field edges to micro-habitat disturbances and elevation bands:
- Look for logging cuts (2 to 6 years old), recent prescribed burn scars (new shoots emerging from ash hold 18% to 25% crude protein compared to 8% in unburned timber), beaver pond marshes, and high-elevation avalanche chutes.
- Because food density is lower in big woods, animals travel 1 to 2 miles between bedding and localized oak flats. Spend 70% of your effort on Step 4 (Mast Identification)—finding the single ridge with dropping white oaks or beech nuts concentrates every animal within a 1,000-acre basin.
2. Western Open-Country Elk & Mule Deer
In western basins, sagebrush flats, and alpine meadows, invert the time ratio between digital mapping, physical walking, and optics:
- Step 3 (Long-Range Glassing) becomes 80% of the process. Upgrade from 8x42mm binoculars to 10x42mm/12x50mm binoculars paired with a 20-60x80mm spotting scope on a carbon-fiber tripod. Glass from 1 to 3 miles away at dawn and dusk.
- Skip Step 6 (Trail Cameras) in wide-open western basins unless monitoring a desert water guzzler or narrow aspen wallow funnel. Rely on dark-timber to parks transitions, north-facing seepage meadows (which stay green in September when south slopes bake brown), and post-snowfall south-facing windblown ridges.
3. Wild Turkey Feeding Areas (Spring vs. Fall)
Turkeys lack a sense of smell, eliminating the wind and thermal restrictions of Steps 3, 4, and 7, though their eyesight requires complete camouflage and stillness:
- Sign Modification (Step 5): Look for V-shaped leaf scratchings in hardwood timber (pointing in the direction the flock is traveling), J-shaped gobbler droppings vs. spiral-shaped hen droppings, and dust bowls along sandy field corners.
- Food Targets: In fall/winter, target scratched oak ridges, picked corn stubble, and waste grain in cattle pastures (where turkeys pick undigested grain and beetles from cow manure). In spring, target freshly disked agricultural fields, chufa plots, and short-grass bugging zones after a warm rainstorm (earthworms and grasshoppers).
Time and Cost Breakdown by Scouting Method
| Scouting Method | Upfront Equipment Cost | Ongoing Annual Cost | Time Required per Tract (200 Acres) | Scent & Pressure Risk |
| Desktop E-Scouting | $0 (Hardware owned) | $0 (Google Earth) to $35–$50/yr (onX / Spartan Forge) | 45 to 90 minutes | Zero (0%) |
| Long-Range Glassing | $150–$300 (Entry 8×42/10×42) to $1,500–$2,500+ (Alpha glass + tripod) | $0 | 2 to 4 hours (split across 2 evenings) | Very Low (<5%) |
| Physical Sign Scouting | $0 to $120 (Rubber boots + wind checker + pruners) | $0 | 2 to 3 hours of midday walking | High (70%+ if wind is ignored) |
| SD Trail Cameras (x3) | $120–$210 (3 cameras + SD cards + lithium batteries) | $30–$45/yr (Replacement batteries) | 1 hour setup + 1 hour per card pull | Moderate (Requires revisit to pull cards) |
| Cellular Trail Cameras (x3) | $250–$450 (3 cell cameras + SD cards + lithium batteries) | $180–$450/yr ($5–$15/mo data per cam + batteries) | 1 hour initial setup only | Low (After initial 48-hour scent fade) |
Frequently Asked Questions
How far do deer and elk travel from bedding to feeding areas?
Whitetail deer typically travel 150 to 400 yards between daytime bedding cover and evening feeding areas during the early fall when food is abundant, expanding up to 1 mile in winter when food is scarce. Elk regularly cover 1 to 3 miles daily between dark-timber sanctuary bedding and open parks.
How can you tell which oak trees are dropping acorns first?
Check the leaf lobes using binoculars. Trees in the White Oak group (Quercus alba, Swamp White Oak, Chestnut Oak) have smooth, rounded leaf lobes without bristles and drop low-tannin acorns first in September and early October. Red Oak species have pointed, bristle-tipped lobes and drop bitter acorns later.
What is the best time of day to scout for feeding areas on foot?
Walk into potential feeding areas between 10:00 AM and 2:00 PM on dry, sunny days or during a steady midday rainstorm. Game animals are bedded away from open feeding zones during midday, and rising solar thermals pull your human scent upward into the canopy rather than across the ground.
How long after scouting a feeding area will game return?
If you wear rubber boots, avoid touching waist-high vegetation with bare hands, and scout during midday without physically bumping animals from their beds, residual ground scent dissipates enough for undisturbed evening feeding within 24 to 48 hours—or immediately if a 0.25-inch rain falls after your walk.
Why are my trail cameras not getting pictures in an area covered in tracks?
You are either scouting cold sign made weeks ago when a crop or mast tree was peaking, or your camera is aimed perpendicular to a fast-travel trail where the animal clears the frame before the sensor triggers. Verify fresh olive-centered droppings first, then angle the camera 45 degrees down the trail.
Mastering how to find feeding areas comes down to respecting the sequence: filter the landscape on a screen first, glass from afar second, verify fresh mast and droppings on rising midday thermals third, and confirm daylight timing with angled trail cameras last. Follow those seven steps with strict scent discipline, and your first sit over a newly scouted food source will put you in front of undisturbed, natural daylight movement.