
To learn how to read animal signs, follow an eight-step field protocol that moves from macro-corridor scanning and biological trace triage to low-angle print illumination, anatomical measurement, gait mapping, control-pit aging, digital cross-referencing, and plaster casting. A complete field evaluation takes 15–45 minutes, suits beginners, and hinges on mastering low-angle light to expose subtle substrate shadows.
Before You Start: Field Readiness Box
- Time Required: 15–20 minutes for standard identification and aging; 45–60 minutes if extracting a physical plaster cast.
- Difficulty Level: Beginner to Intermediate.
- Typical Cost: $0 for visual observation; $10–$15 for basic measuring gear; $5–$15 for premium offline tracking apps; $5–$25 for a field casting kit.
- Prerequisite Conditions: Access to a transition zone (forest edge, streambank, mud flat, or snowfield). Early morning (first 90 minutes after sunrise) or late afternoon provides optimal natural shadow angles.
Phase 1: Macro-Corridor & Biological Trace Triage
Beginners fail because they stare straight at their boots hoping a textbook footprint appears. Experienced trackers scan the landscape from macro to micro—locating wildlife highways and biological traces first, then inspecting the soft dirt underneath them.
Step 1: Locate High-Probability Substrate Traps
Scan habitat transition zones to locate a “track trap”—a patch of fine, impressionable soil, mud, sand, or snow intersecting a natural travel corridor.
Look for edge habitats where two cover types meet, such as timber bordering a meadow, a creek crossing, or a saddle between two ridges. Within these corridors, locate a compressed game trail (typically 15–30 cm wide for medium-to-large mammals). Follow the trail until it crosses a soft substrate like silt along a puddle edge, damp clay, fine sand, or snow deeper than 2 cm. Stop 1.5 meters back from the soft patch so your boots do not trample the periphery.
- Success Checkpoint: You’ll know it worked when you identify a undisturbed linear path of flattened vegetation leading directly into a bare patch of deformable soil, silt, or snow.
- Common Mistake: Walking directly down the center of the game trail. Always walk 1 meter parallel to the trail (“off-axis”) to preserve faint toe drags and micro-signs.
Step 2: Inspect Vertical Browse Marks and Tree Rubs
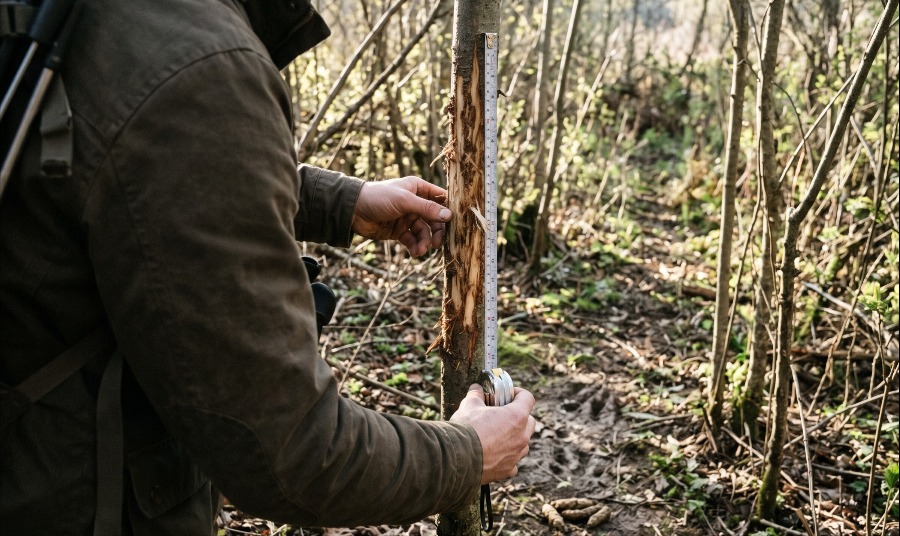
Examine woody stems, grasses, and tree bark from ground level up to 2 meters high to identify feeding dentures and territorial markings.
Measure the height of clipped twigs and stripped bark using your tape measure, then inspect the cut geometry at 10 cm distance:
- Clean 45-Degree Snips (Under 50 cm high): Lagomorphs (rabbits and hares) and rodents possess sharp upper and lower incisors that slice stems cleanly like pruning shears at a crisp 45-degree angle.
- Ragged, Shredded Tears (30 cm to 150 cm high): Cervids (white-tailed deer, mule deer, elk) lack upper incisors. They clamp twigs between their lower teeth and hard upper dental pad, jerking their heads upward to leave frayed, fibrous, crushed stem ends.
- Antler Rubs vs. Bear Markings: Male cervids rub saplings (2–10 cm diameter) between 40 cm and 110 cm off the ground during autumn rut, shredding bark vertically with smooth wood polishing inside the scrape. Bears leave parallel 5-claw diagonal or vertical gouges high on mature trunks (120 cm to 200 cm off the ground), often accompanied by coarse guard hairs snagged in oozing pitch.
- Success Checkpoint: You’ll know it worked when you can classify the herbivore guild (rodent/lagomorph vs. cervid) by cut angle alone and establish the vertical reach of the animal.
- Common Mistake: Confusing porcupine bark feeding with antler rubs. Porcupines gnaw irregular horizontal patches high in the canopy and leave distinct 3 mm wide paired incisor grooves in the sapwood; antler rubs lack tooth grooves and stay below 1.2 meters.
Step 3: Dissect Scat Morphology and Dietary Remnants
Break open fecal deposits using two disposable sticks to determine the animal’s trophic level, gut size, and time since passage.
SAFETY WARNING: Never touch scat with bare hands or inhale directly over the sample. Carnivore and omnivore feces carry lethal zoonotic parasites, including Baylisascaris procyonis (raccoon roundworm) and Echinococcus multilocularis tapeworm eggs. Stand upwind and use two dry sticks to manipulate the sample.
Measure the scat diameter and length before disturbing it, then classify its structure:
- Herbivore Scat: Appears as uniform compressed pellets or fibrous spheres. Rabbit pellets are 7–12 mm round, dry, and packed with coarse sawdust-like wood fibers. Deer pellets are 10–20 mm cylindrical-ovoid, dark brown to black, and smooth-walled.
- Carnivore Scat: Tubular, segmented, and tapered to a twisted point at one or both ends due to digested hair or feathers. Canine (coyote/fox) scat typically measures 15–25 mm in diameter, contains bone shards, berry seeds, and fur, and is deposited prominently in the center of trails as a territorial marker. Feline (bobcat/cougar) scat is segmented into blunt, dense cylinders (“tootsie rolls”) and is often partially buried inside a scraped mound of dirt or pine needles.
- Freshness Check: Pry the center open with your sticks. If the exterior is steaming, glossy with mucus, or attracts blowflies within 2 minutes, the animal passed within 1–2 hours. If the exterior is sun-crusted and grey but the interior core remains dark, moist, and pliable, it is 12–48 hours old.
- Success Checkpoint: You’ll know it worked when you isolate the internal matrix (wood fiber, seed, hair, or bone) and establish whether the core moisture matches or differs from the outer crust.
- Common Mistake: Judging scat age solely by its dry exterior on a sunny or windy day. High wind crusts the outer 1 mm of deer or coyote scat in under 90 minutes while the core stays completely wet.
Phase 2: Ground Print & Gait Biometrics
Once corridor signs confirm animal activity, shift your focus to the ground substrate to extract exact species identity, weight distribution, and movement speed.
Step 4: Illuminate the Print with Low-Angle Light
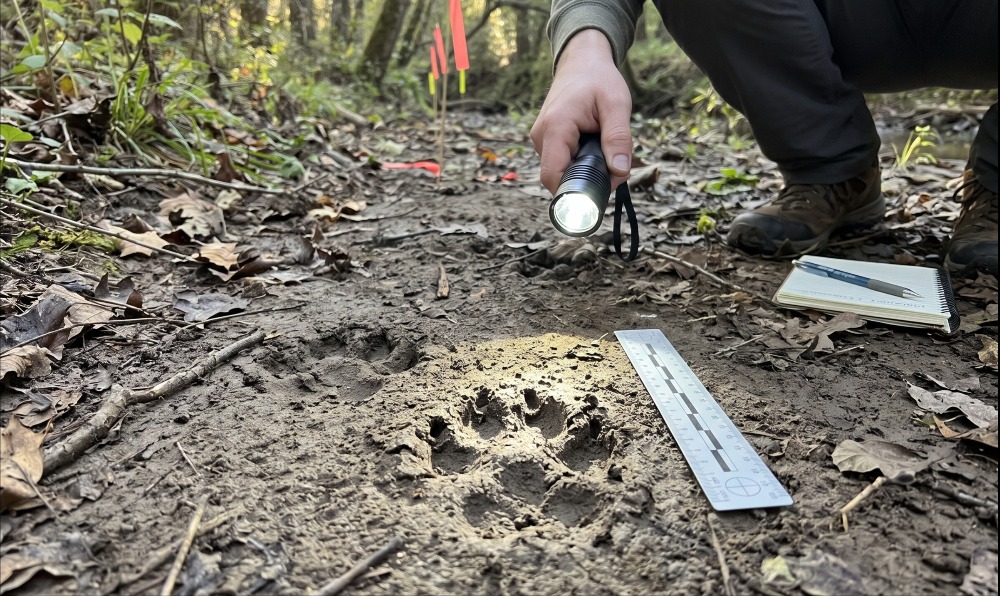
Position your eyes on the opposite side of the track from the sun, or shine a 300-lumen flashlight at a 10–15° angle across the substrate to cast deep micro-shadows inside the print cavity.
Never inspect a footprint with the sun behind your back; top-down or rear light washes out shallow depressions, making a 4-toed canine print look like an amorphous smudge. Walk around the track so the track sits directly between you and the light source. In flat midday light, heavy overcast, or forest shade, hold your flashlight 10–15 cm above the dirt and sweep the beam horizontally across the track surface. This turns a 1 mm pad ridge into a high-contrast shadow line.
- Success Checkpoint: You’ll know it worked when faint toe pads, claw pricks, and the anterior border of the heel pad pop into sharp three-dimensional relief.
- Common Mistake: Crouching directly over the track and casting your own body shadow across it. Stand 60 cm back and off to the side so ambient light remains unobstructed.
Step 5: Measure Print Anatomy and Negative Space
Count the toes, trace the negative space between pads, and measure the exact length and width of the print to the nearest millimeter.
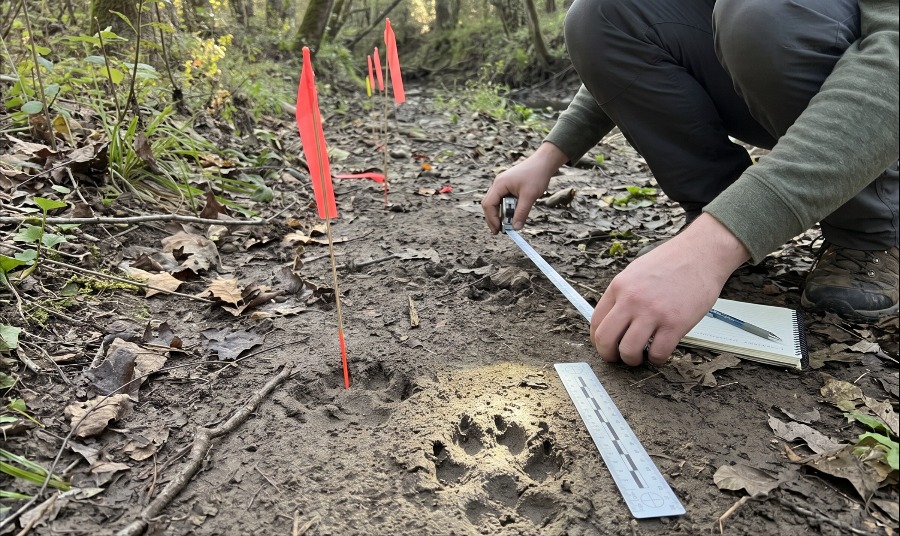
Lay your metric scale ruler flat beside (never inside) the track, parallel to the line of travel. Record four anatomical traits:
- Toe Count:
- 2 Cloven Toes (Hooves): Ungulates. Deer leave heart-shaped prints with pointed tips and a sharp central cleft; wild hogs leave rounded, splayed tips that resemble pliers.
- 4 Toes (Front & Rear): Canines (coyote, fox, domestic dog) and felines (bobcat, cougar, lynx).
- 5 Toes (Front & Rear): Bears, raccoons, mustelids (otters, badgers, skunks, fishers), and opossums. Note: Most rodents (squirrels, mice, voles) show 4 toes on the front feet and 5 toes on the rear feet.
- Feline vs. Canine Differentiation (The X vs. M Test):
- Canines: Draw two straight lines through the empty dirt (negative space) between the inner toes, outer toes, and heel pad. If the lines cross cleanly without touching a pad, it forms an “X”. Canines also show blunt triangular heel pads with a single anterior lobe and visible claw marks ahead of the toes.
- Felines: The negative space forms a curved “C” rather than an X. The heel pad is large and trapezoidal, featuring a distinct two-lobed leading edge and a three-lobed rear edge (forming an “M” or “W” depending on viewing angle). Felines walk with claws retracted, leaving zero claw marks unless slipping in deep mud, plus an asymmetrical leading middle toe (similar to your human middle finger) that reveals whether it is a left or right foot.
- True Length & Width Metrics: Measure Track Length from the rear edge of the heel pad to the front edge of the longest toe pad (exclude claw marks unless recording “overall length with claws” separately for apps). Measure Track Width across the widest point of the splayed outer toes perpendicular to the line of travel.
- Success Checkpoint: You’ll know it worked when you have written down the exact toe count, claw presence, heel pad geometry, and millimeter dimensions (e.g., “62 mm L x 50 mm W, 4 toes, X negative space, claws present = Adult Coyote Front”).
- Common Mistake: Measuring the top lip of the crater in mud or snow rather than the compressed floor at the bottom of the print. Measuring the upper crater Rim inflates a 5 cm coyote print into a 9 cm wolf print.
Step 6: Map the Gait Pattern, Stride, and Straddle
Place flagging skewers behind 4 to 6 consecutive tracks to classify the animal’s locomotion group and measure its stride and straddle.
Insert a skewer directly behind the heel of each visible print along the trail for 2–3 meters. Step back and read the geometric lane:
- Striders / Direct-Register Walkers (Deer, Felines, Wild Canines): The animal places its rear foot directly into the print just vacated by its front foot on the same side to conserve energy and minimize noise. This produces a narrow, nearly straight single-file zig-zag of overlapping prints. (Domestic dogs rarely direct-register, leaving messy, splayed tracks where rear feet land beside front feet).
- Waddlers / Pacers (Bears, Raccoons, Beavers, Skunks, Porcupines): Wide-bodied animals move both limbs on one side of the body together, leaving a wide trail with paired or offset tracks where the long 5-toed hind foot often lands immediately next to the smaller front foot.
- Bounders (Weasels, Mink, Marten, River Otters): Long-bodied mustelids leap forward with their front feet and bring their back feet down directly into the front tracks, creating repeating twin-print clusters (2×2 patterns) spaced 30–90 cm apart.
- Hoppers / Gallopers (Rabbits, Hares, Tree Squirrels, Mice): The animal pushes off with its front feet and swings its oversized hind feet completely past the front paws before landing. The two large hind prints always sit ahead of the two smaller front prints in the direction of travel.
- Rabbit vs. Squirrel Sub-Rule: Rabbits stagger their two small front feet one behind the other (diagonal offset) because they live on the ground; tree squirrels place their two front feet side-by-side (paired) because they leap symmetrically onto vertical tree trunks.
- Measure Stride & Straddle:
- Stride: Measure from the heel of one foot to the heel of the next print made by that exact same foot (or from the rear of one bound cluster to the rear of the next).
- Straddle (Trail Width): Lay one stick along the outer edge of the left tracks and another along the outer edge of the right tracks. Measure the perpendicular distance between the two sticks.
- Success Checkpoint: You’ll know it worked when your skewer line reveals the exact repeating footfall rhythm and confirms the direction of travel, baseline body width (straddle), and speed (a sudden doubling of stride length combined with deeper toe-first dirt throw behind the print indicates the animal bolted into a run).
- Common Mistake: Assuming the two big prints at the front of a rabbit or squirrel cluster are the front paws. Because hoppers leapfrog their hind legs past their forelegs, the large hind tracks lead the pattern—beginners who miss this read the animal’s direction of travel 180 degrees backward in flat snow.
Phase 3: Aging, Digital Verification, & Preservation
With raw anatomical and spatial metrics logged, calibrate the exact age of the sign against local weather and preserve the evidence.
Step 7: Calibrate Print Age Using a Control Compression Pit
Press your thumb or boot heel into the undisturbed soil 15 cm beside the animal track to create a fresh “Zero-Minute Control Print,” then compare edge sharpness, soil crumble, and moisture levels.
Because soil moisture, clay content, wind, and sun alter degradation rates by up to 1,000%, never guess age without a local control test:
- Press into the exact same substrate with roughly the same downward pressure the animal exerted (match the depth of the animal’s print).
- Compare the Crater Rim & Micro-Fissures: Look at the tiny vertical mud cracks and uplifted soil grains on your 0-minute print. If the animal track has identical sharp, fragile micro-ridges and dark, moist soil exposed on the print floor that matches your control print, the animal passed within under 60 minutes.
- Check Gravity Slump & Oxidation: If your control print exposes dark, damp earth, but the animal print floor has oxidized to the same pale, dry color as the surrounding ground and the rim edges have slumped into smooth, rounded shoulders, the track is over 12–24 hours old.
- Audit Superimposed Weather & Insect Sign: Look inside the animal print with your flashlight. Raindrop craters, dew spiderwebs spun across the cavity, fallen leaves, or tiny beetle tracks crisscrossing on top of the heel pad prove the track was made before the last rain shower, nightfall, or morning insect activity.
- Success Checkpoint: You’ll know it worked when you can bracket the track’s age within a narrow window (e.g., “Made after the 4:00 AM rain shower, but before 8:00 AM sun-drying—roughly 2 to 4 hours old”).
- Common Mistake: Mistaking freeze-thaw expansion for a fresh, massive predator print. When a 5 cm dog track in wet mud or snow freezes overnight and thaws in the morning sun, the edges melt outward into a rounded, 9 cm depression that mimics a mountain lion or wolf. Check your control print for crisp pad margins first.
Step 8: Cross-Reference Digital Databases or Cast the Print
Input your exact millimeter measurements into an offline tracking database to verify species identity, or pour a 2:1 gypsum plaster slurry to extract a permanent 3D cast.
Option A: Digital Verification (5 Minutes)
- Open iTrack Wildlife Pro (or your regional tracking database) on your smartphone.
- Enter the Toe Count (Front and Rear), Print Length (mm), Print Width (mm), Claw Presence (Yes/No), and Straddle Width.
- Filter by your current state/province or habitat zone. Compare the top statistical candidates against your low-angle photos, paying close attention to heel pad lobe proportions and negative space geometry.
Option B: Direct Physical Casting (30–45 Minutes)
- Prepare & Stabilize the Print: Use tweezers or a light breath to remove fallen pine needles or twigs from inside the print without touching the dirt walls. If the track is in dry sand, dust, or powdery snow, mist it lightly from 30 cm above using a fine-mist water atomizer (or unscented aerosol hairspray) to bind the surface grains so wet plaster does not erode the details.
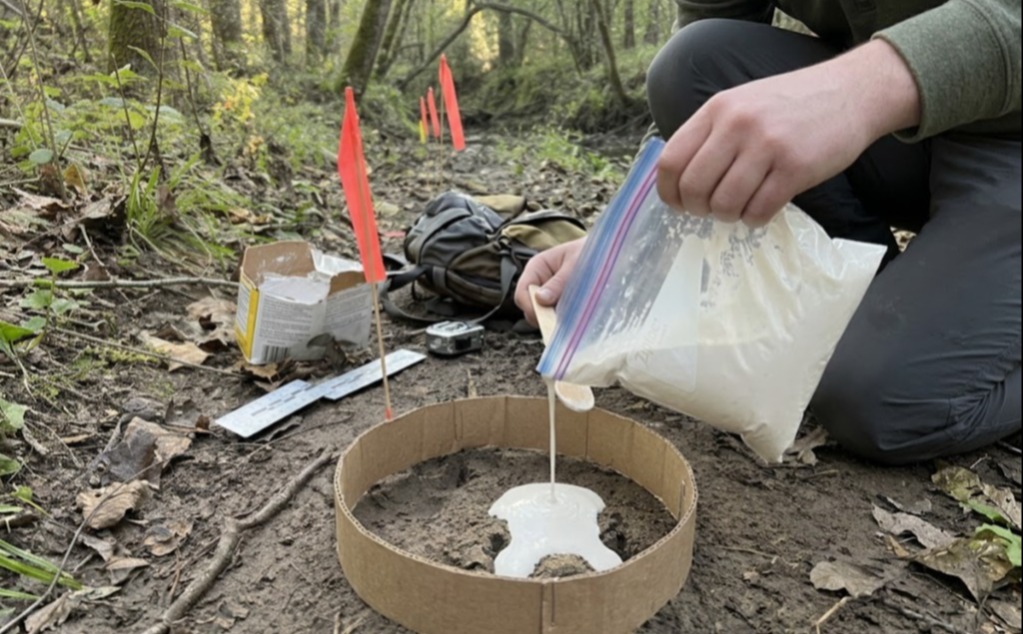
- Set the Collar: Bend a strip of heavy cardboard (5 cm wide x 40 cm long) into a ring that leaves a 2 cm margin around the outside of the print. Secure the ends with paperclips and press the bottom edge 5 mm into the soil so plaster cannot leak underneath.
- Mix the Slurry: Pour 250 ml of cold water into a heavy-duty Ziploc bag. Add 500 ml of Plaster of Paris (a 2:1 powder-to-water ratio by volume) or dental stone. Seal the bag and knead gently from the outside for 90 seconds until it reaches the consistency of thick pancake batter, squeezing out air bubbles.
- Pour the Cast: Cut a 2 cm corner off the bottom of the Ziploc bag. Hold your wooden stick or spoon just above the track and pour the plaster down the stick so it flows gently into the deepest toe depressions first without blasting the soil walls. Fill the collar to a thickness of 2.0 to 2.5 cm. (In soft mud, lay two small green twigs across the plaster halfway through the pour to act as internal rebar so the cast doesn’t snap).
- Cure & Extract: Let the cast sit undisturbed for 20 to 30 minutes (up to 45 minutes in cold, damp air under 5°C). Do not lift the cast directly upward by its edges, or vacuum suction in wet mud will shear off the delicate toe tips. Instead, dig underneath the entire cast with a trowel or flat stick, lifting the plaster along with a 2 cm plug of underlying dirt. Wrap in newspaper, let cure for 24 hours at home, then brush off the dry dirt under lukewarm running water with a soft toothbrush.
- Success Checkpoint: You’ll know it worked when the cured cast lifts cleanly in one solid piece, capturing microscopic pad papillae (skin pebbles), claw angles, and exact relief depth without air-bubble voids on the toe tips.
- Common Mistake: Mixing the plaster too thick (like bread dough) or pouring it straight from a height of 15 cm into the track. Thick plaster traps air pockets at the tips of the toes and obliterates delicate claw impressions; always pour a smooth, creamy slurry down a baffle stick.
Comprehensive Tracking Methods & Phase Comparison
| Method / Phase | Best Suited For | Primary Identifying Clues | Key Field Constraints | Est. Cost |
| Ground Print & Gait Analysis | Active hunters, wildlife photographers, real-time trackers | Toe counts, X vs. M pad geometry, claw marks, stride/straddle | Requires deformable soil or snow; eroded rapidly by wind/rain | $0 – $15 (Tape measure) |
| Micro-Sign & Biological Triage | Land managers, habitat scouts, naturalists mapping resident animals | Scat morphology/contents, 45° vs. torn browse cuts, rub heights | Lower temporal precision than prints; zoonotic pathogen risks | $0 (Visual & stick tools) |
| Digital Field Guides & Apps | Beginners, educators, citizen science conservationists | Millimeter lookup filters, regional overlays, comparative overlays | Requires clear prints for metrics; cold drains phone batteries | $5 – $15 |
| Direct Plaster Casting | Wildlife biologists, researchers, archivists building reference catalogs | Full 3D relief dimensions, microscopic pad skin textures, claw angles | Adds 1.5 kg pack weight; requires 20–45 min field curing downtime | $5 – $25 |
Common Mistakes and How to Fix Them
Even seasoned outdoor enthusiasts misread trails when environmental variables distort the evidence. Use these five troubleshooting protocols to recover when your field reading hits a dead end:
- Failure Mode: Misidentifying Double-Registers as a 6- to 8-Toed Mystery Animal
- Why It Happens: When a deer, bobcat, or coyote walks in a partial register, the hind foot lands slightly overlapping the rear half of the front print. Beginners count all visible impressions together and see an oversized, 7-toed composite print.
- How to Fix It: Inspect the center of the depression with your flashlight at a 10° angle to find the secondary ridge line where the rear toe pads sliced through the front heel pad. Follow the trail for 3–4 more steps until the animal steps over a stick or turns, separating the front and rear feet into clean, individual prints.
- Failure Mode: Confusing a Large Domestic Dog with a Coyote or Wolf
- Why It Happens: A 25 kg dog leaves a 4-toed print with claw marks that overlaps the exact size range of an adult coyote or juvenile wolf.
- How to Fix It: Check three features: First, look at the outer toe claws—coyote outer claws curve inward toward the two center toes, whereas dog claws splay outward. Second, inspect the heel pad—coyote front heel pads have a concave (scooped) rear edge, while dog heel pads are rounded and bulbous. Third, read the trail geometry—wild canines run a laser-straight, energy-efficient direct register; domestic dogs weave erratically off-trail with a wide, sloppy straddle.
- Failure Mode: Losing the Trail Completely on Hard-Packed Clay or Pine Needles
- Why It Happens: The animal steps out of the mud trap onto dry forest duff or hardpan where no sunken footprint forms, causing the tracker to wander blindly and trample the onward trail.
- How to Fix It: Anchor your last known track with a flagging skewer. Measure the animal’s last stride length (e.g., 42 cm) and project that exact distance forward along its heading. Instead of looking for a full print, drop your head to 30 cm off the ground and scan for micro-disturbances: crushed grass blades reflecting a shiny glaze (“compression shine”), cracked pine needles with sharp white fractures, or tiny pebbles flipped over to expose dark, damp soil underneath.
- Failure Mode: Plaster Cast Crumbles or Sticks to Wet Mud During Extraction
- Why It Happens: Either the water-to-plaster ratio exceeded 1:1.5, or the tracker pried the cast out at 10 minutes while the gypsum was still going through its exothermic (warming) chemical phase.
- How to Fix It: Touch the back of the curing plaster with the back of your finger. Gypsum heats up as it crystallizes and only reaches full structural strength after it cools completely back down to ambient air temperature (25–35 minutes). If a cast cracks during extraction, keep all fragments packed inside the dirt plug, allow them to dry completely for 24 hours, clean with a dry brush, and bond the clean fracture lines with cyanoacrylate glue (Super Glue).
- Failure Mode: Misreading Melted “Ghost Tracks” in Snow
- Why It Happens: Solar radiation melts the dark walls of a snow track faster than the compressed ice floor, causing a squirrel or housecat print to expand to 300% of its original size within 6 hours.
- How to Fix It: Follow the line of travel until it enters deep coniferous shade, a north-facing bank, or passes under a fallen log. Shaded snow preserves the original unmelted print dimensions and sharp toe pad edges.
Variations: Adapting the Protocol to Different Conditions
1. Tracking in Deep vs. Crusty Snow (Winter Adaptation)
- Powdery Snow (Over 10 cm Deep): Individual toe pads vanish inside deep plunge holes. Shift immediately from print anatomy (Step 5) to gait geometry and drag marks (Step 6). Measure straddle width, stride length, and check for tail drags (mice, porcupines, and otters leave distinct centerline tail troughs) or foot-drag troughs between steps (deer drag their hooves in snow deeper than 15 cm, whereas coyotes lift their paws cleanly out of the hole).
- Sub-Zero Casting Adjustment: In temperatures below 0°C (32°F), pouring liquid water-plaster slurry directly into a snow print melts the track instantly. Pack snow around the outside of your collar, mix your plaster using ice-cold slush water (stir snow into your mixing water until it stops melting), and lightly mist the snow print with cold water from 40 cm away 3 minutes beforehand so a protective 1 mm ice glaze freezes over the print floor.
2. Arid Sand & Desert Wash Tracking
- Loose Dune Sand: Dry sand has a natural angle of repose around 34 degrees, meaning vertical track walls collapse immediately into conical funnels. Skip midday tracking completely. Track only during the first 60 minutes after dawn, when overnight relative humidity and dew bind the surface quartz grains together and the sun is under 15 degrees above the horizon. Read the shape of the sand throw kicked forward by the toes to determine speed and direction.
3. Nighttime Tactical & Backcountry Tracking
- Artificial Light Sweep: When tracking after dark (e.g., recovering game or locating nocturnal predators), switch off your headlamp—a light mounted on your forehead shines straight down your line of sight and erases all track shadows. Instead, hold a 300- to 500-lumen handheld flashlight in your non-dominant hand at knee height, sweeping it horizontally from side to side as you walk parallel to the trail.
Time and Cost Breakdown
Learning how to read animal signs scales from zero-dollar wilderness observation to professional archival documentation. Here are realistic field benchmarks:
| Activity / Skill Tier | Time Required per Trail | Upfront Equipment Cost | Ongoing Consumable Cost |
| Rapid Field ID (Print + Gait) | 5 – 10 minutes | $0 – $15 (Basic tape measure & flashlight) | $0 |
| Full Ecological Audit (Prints + Scat + Browse + Aging) | 15 – 25 minutes | $15 – $35 (Tape, Rite in the Rain notebook, scale ruler) | $0 |
| App-Assisted Biometric Verification | 10 – 15 minutes | $5 – $15 (one-time app purchase) | $0 (Offline database) |
| Archival 3D Plaster Casting | 35 – 60 minutes | $10 – $25 (initial field kit) | $1.50 – $3.00 per cast (250–500g dental stone) |
Frequently Asked Questions (FAQ)
How do you tell the direction an animal is moving when footprints are blurry?
Examine the soil displacement rim and pressure release walls inside the depression. An animal pushes backward against the earth to propel itself forward, piling a higher lip of compressed dirt or snow at the rear of the print while kicking loose particles forward along the line of travel.
How can you distinguish between front and back footprints of the same animal?
In almost all quadrupeds (deer, canines, felines), the front feet are wider and larger than the hind feet because they support roughly 60% of the animal’s body weight, including the heavy head and chest. Conversely, in bears, raccoons, rodents, and rabbits, the hind feet are significantly longer than the front feet.
Why do some animal tracks show 4 toes in one spot and 5 toes in another?
Two scenarios cause this: either you are looking at a rodent (such as a squirrel, beaver, or marmot), which anatomically possesses 4 toes on its front paws and 5 toes on its back paws, or you are tracking a 5-toed mustelid or bear whose diminutive inner fifth toe (Hallux/Pollex) failed to register in firm dirt.
Is dental stone better than Plaster of Paris for casting animal tracks?
Yes. While standard Plaster of Paris costs less ($5 per bag) and sets in 20 minutes, Gypsum Dental Stone (Type III or IV) cures to a compressive strength 3 to 4 times harder. Dental stone captures microscopic skin pad ridges without chalking or snapping when scrubbed clean under water.
Can you tell an animal’s sex from its tracks and signs?
Footprints alone rarely prove sex, though mature male white-tailed deer often show a wider straddle and deeper outer-hoof splay than does. Combine tracks with urine placement inside the gait: male canines and cervids urinate forward between their front and hind tracks, whereas females squat and urinate behind or directly between their hind prints.
Putting Your Field Protocol Into Practice
Mastering how to read animal signs transforms an empty forest or mud bank into a timestamped biological logbook. Start your next outing by finding a single creek-side mud trap, illuminating a print with a low-angle flashlight, logging its exact millimeter dimensions, and digging a 0-minute control pit beside it. Once you verify three trails using this eight-step protocol, print geometry and gait rhythms become second nature.