
Learning how to choose hunting clothing requires building a modular three-layer system matched to your metabolic output, local climate, and target species. By executing seven steps-mapping climate profiles, auditing species vision, selecting base, mid, and outer layers, matching camouflage geometry, and stress-testing-you can assemble a field-ready kit in 90 minutes with beginner difficulty, where moisture management determines success.
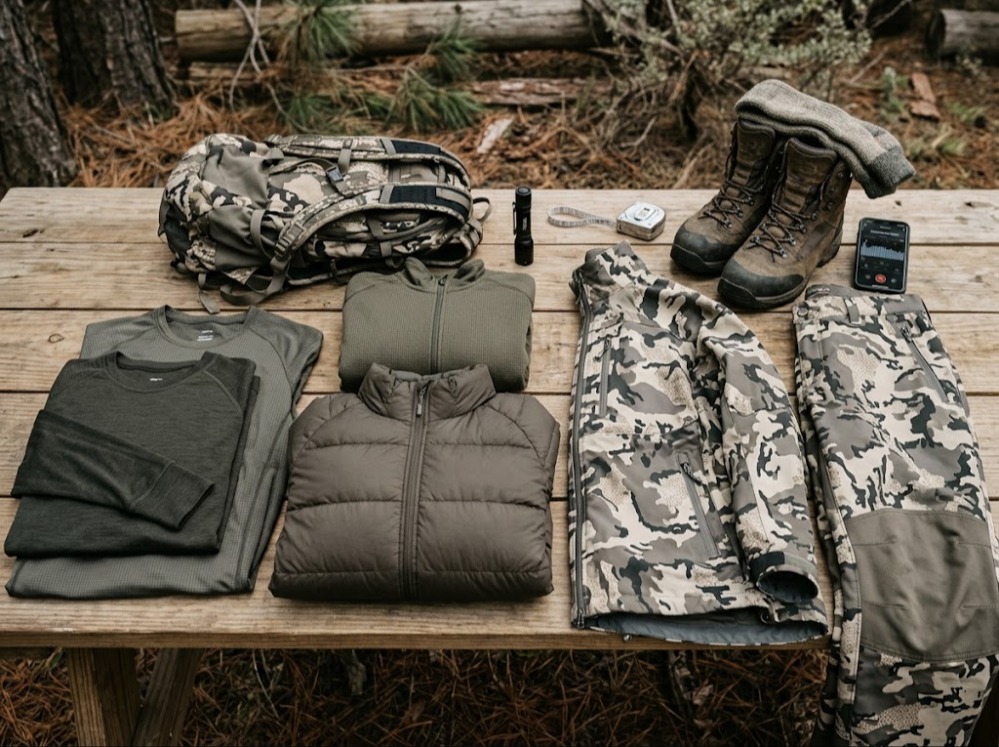
Before You Start: Prerequisites & Specifications
- Time Required: 60–90 minutes (research, measurement, and mechanical testing)
- Difficulty Level: Beginner to Intermediate
- Typical Cost Range: $150–$350 (Entry Level) | $600–$1,200 (Mid-Tier Technical) | $1,800–$2,800+ (Elite Backcountry System)
- Tools & Materials Checklist:
- [ ] 1x Soft tailor’s measuring tape (60-inch minimum)
- [ ] 1x 365 nm Ultraviolet (UV) LED flashlight (for optical brightener inspection)
- [ ] 1x Smartphone with a calibrated decibel meter app (e.g., NIOSH Sound Level Meter)
- [ ] 1x 16 oz spray bottle filled with tap water (for DWR bead testing)
- [ ] Your primary hunting weapon (compound bow or unloaded rifle) and pack (loaded to 25 lbs)
- [ ] 10-year historical weather data for your hunting unit (via NOAA or local weather station)
- Prerequisite Conditions: You must know your target species, weapon type, hunting style (static ambush vs. active spot-and-stalk), and state wildlife agency regulations prior to purchasing fabric.
Phase 1: Environmental and Biological Mapping
Step 1: Audit Your Climate and Metabolic Activity Ratio
Calculate the minimum and maximum temperatures, precipitation probabilities, and your active-to-static time ratio for your specific hunting season.
Pull 10-year historical weather data for your exact hunting dates and elevation-accounting for a temperature drop of 3.5°F per 1,000 feet of elevation gain. Next, establish your Metabolic Activity Ratio: estimate the percentage of your hunt spent moving (generating 400–600 kcal/hour of body heat) versus sitting stationary (generating 70–100 kcal/hour). Write down two distinct temperature ratings: your Active Temp (actual air temperature plus 25°F for physical exertion) and your Static Temp (actual air temperature minus windchill).
- Success Checkpoint: You’ll know it worked when you have a written profile specifying a temperature spread (e.g., “15°F static dawn to 55°F active midday”), maximum expected wind speed in mph, and an exact movement percentage (e.g., “80% static treestand / 20% hike-in”).
- Common Mistake: Dressing for the cold morning walk-in temperature rather than your metabolic heat output. If you wear your heavy static insulation while hiking 1.5 miles to a stand, you will sweat within 12 minutes, soaking your base layer and causing conductive hypothermia once you stop moving.
Step 2: Verify Legal Blaze Mandates and Species Vision
Determine your state’s mandatory fluorescent daylight color requirements and the visual spectrum capabilities of your target game animal.
Check your state wildlife agency handbook for firearm and muzzleloader regulations; most jurisdictions require 400 to 500 square inches of solid daylight fluorescent orange or pink (wavelength 590–610 nm) visible across the chest, back, and head. Next, classify your quarry’s visual acuity:
- Ungulates (Whitetail, Mule Deer, Elk, Pronghorn): Dichromatic vision. They lack red-sensitive cone photoreceptors (seeing orange and red as muted grays/browns) but possess high rod density and UV-sensitive cones that detect wavelengths down to 350–400 nm (short-wave blues and optical brighteners glow like neon).
- Waterfowl and Wild Turkeys: Tetrachromatic vision. They see full RGB color plus ultraviolet wavelengths with 3x human visual acuity, requiring full 3D concealment with zero exposed skin or bright colors.
- Success Checkpoint: You’ll know it worked when you have documented the exact square-inch fluorescent requirement for your season and eliminated blue-spectrum dyes and chemical optical brighteners from your prospective gear list.
- Common Mistake: Wearing commercial “hunter orange” vests treated with laundry optical brighteners during deer season. Even though deer cannot see the orange pigment, the UV brighteners reflect 400 nm blue light, turning you into a glowing silhouette at dawn and dusk.
Phase 2: Engineering the Three-Layer Architecture
Step 3: Select Next-to-Skin Base Layers by Fabric GSM
Choose a hydrophobic synthetic or fine-micron Merino wool base layer weighted in grams per square meter (GSM) to match your temperature range and trip duration.
Never wear cotton next to your skin; cotton retains 27 times its weight in water and reduces thermal insulation by 95% when wet. Select your base material and fabric weight using these exact operational parameters:
- Above 50°F (Active/Early Season): 120–150 GSM ultralight Merino wool (17.5–18.5 micron fiber diameter to prevent skin itching) or 100–130 GSM gridded polyester with silver-ion antimicrobial treatment (Polygiene).
- 25°F to 50°F (Mid-Season/All-Around): 190–220 GSM midweight Merino wool blends (80% Merino / 20% nylon core-spun for abrasion resistance).
- Below 25°F (Late Season/Static): 250–320 GSM heavyweight Merino wool or dual-layer polypropylene/polyester grid fleece (e.g., Polartec Power Grid).
Choose Merino wool for multi-day backcountry trips (3–10 days) because keratin proteins naturally inhibit odor-causing bacteria, and wool retains 80% of its thermal efficiency when damp. Choose 100% polyester for high-exertion single-day hunts where rapid evaporative drying (under 30 minutes via body heat) is the primary priority.
- Success Checkpoint: You’ll know it worked when the garment fits snug like a second skin without constricting chest expansion, contains 0% cotton on the care tag, and matches the GSM tier for your Step 1 climate profile.
- Common Mistake: Buying a loose-fitting base layer. If the fabric does not make direct contact with at least 85% of your skin surface, moisture vapor will condense into liquid sweat on your skin before the fibers can wick it outward.
Step 4: Configure Mid-Layer Insulation for Thermal Loft
Pair an active breathable mid-layer with a high-loft static insulator using exact fill-power and clo-value specifications.
Divide your mid-layer into two distinct garments-one for moving in cold air (Active Insulation) and one for sitting still (Static Insulation):
- Active Mid-Layer: Select a gridded fleece or air-permeable synthetic jacket (e.g., Polartec Alpha Direct or Toray 3DeFX+) rated at 40–60 CFM (Cubic Feet per Minute) of air permeability. This allows excess heat and moisture vapor to escape while you hike.
- Static Puffy Insulator: Select based on moisture exposure:
- Dry/Sub-Freezing Climates (Rocky Mountain West, Late Midwest): Choose DWR-treated hydrophobic goose or duck down with an 800 to 900+ Fill Power rating and at least 110–170 grams of actual down fill weight.
- Wet/Humid Climates (Pacific Northwest, Alaska, Coastal Marsh): Choose continuous-filament synthetic insulation (PrimaLoft Gold Cross Core or Climashield APEX) at 60–100 g/m² for moderate cold (25°F–40°F) or 133–200 g/m² for extreme cold (<20°F).
| Insulation Material | Warmth-to-Weight | Wet Thermal Retention | Lifespan (Compression Cycles) | Best Operational Use Case |
| 850+ Hydrophobic Down | Highest (Best packability) | Poor (20–30% if saturated) | 10–15 Years | Sub-freezing, low-humidity backcountry glassing |
| Synthetic (PrimaLoft/APEX) | Moderate (Bulkier in pack) | Excellent (90–96% when wet) | 3–5 Years (Loft degrades) | Wet environments, maritime hunts, active sleet/rain |
| Grid Fleece (200–300 GSM) | Low-Moderate | Good (75% when damp) | 8–10 Years | Active stalking, mid-layer under windproof shells |
- Success Checkpoint: You’ll know it worked when your active mid-layer dumps heat during brisk movement, and your static puffy layer creates a minimum 1.5-inch dead-air loft barrier around your torso without feeling tight across the shoulders.
- Common Mistake: Using untreated down insulation in 32°F–40°F sleet or high humidity. Perspiration from the inside and mist from the outside will collapse untreated down clusters within 3 hours, reducing your thermal protection to zero.
Step 5: Choose Outer Shells by Waterproof and Acoustic Metrics
Select your outer soft shell and hard rain shell based on hydrostatic head waterproof ratings, MVTR breathability, and outer face fabric quietness.
Do not wear a waterproof hard shell as an all-day jacket unless it is actively raining or snowing; waterproof membranes trap internal moisture during heavy exertion. Instead, split your outer protection:
- Primary Outer Layer (Soft Shell): For 85% of dry or lightly misting hunting conditions, choose a tightly woven 4-way stretch nylon/polyester soft shell treated with a Durable Water Repellent (DWR) finish. For windy ridges or cold treestands, require a laminated windproof membrane (e.g., GORE-TEX INFINIUM / Windstopper) rated at 0–1 CFM wind permeability.
- Emergency Weather Layer (Hard Shell): Keep a 3-layer microporous membrane rain shell in your pack. Verify two exact laboratory metrics on the manufacturer spec sheet:
- Hydrostatic Head (Waterproofness): Minimum 10,000 mm for light rain; 20,000 mm to 30,000 mm for sustained mountain downpours or kneeling in wet boggy tundra (GORE-TEX Pro, Dermizax EV, or Toray Entrant).
- MVTR (Moisture Vapor Transmission Rate): Minimum 15,000 g/m²/24hr for static hunting; 20,000 to 30,000+ g/m²/24hr for steep backcountry climbs.
- Bowhunting & Close-Range Acoustic Rule: If hunting within 60 yards (archery or thick-timber whitetail), your outer shell must feature a brushed tricot, micro-fleece, or high-gauge knit polyester face fabric rather than exposed ripstop nylon.
- Success Checkpoint: You’ll know it worked when water sprayed from a bottle at 6 inches beads into spheres and rolls off the fabric with zero dark absorption spots, and the spec sheet confirms ≥15,000 mm hydrostatic head and ≥15,000 g/m²/24hr MVTR.
- Common Mistake: Buying cheap PVC-coated or polyurethane non-breathable rain gear (<5,000 g/m²/24hr MVTR). While 100% waterproof from the outside, it acts as a vapor barrier that drenches your inner layers in condensation within 20 minutes of walking.
Phase 3: Camouflage Geometry and Field Verification
Step 6: Match Camouflage Macro- vs. Micro-Pattern Geometry
Select a disruption-based macro-pattern for open or elevated environments, or a mimicry-based micro-pattern for close-range ground brush.
Ignore how a pattern looks to the human eye at 3 feet inside a retail store-at 40+ yards, intricate leaf-and-twig graphics merge into a solid dark blob (“blobbing out”), alerting animals to your human outline. Select your pattern geometry by engagement distance and backdrop:
- Macro-Disruption Patterns (KUIU Verde/Valo, Sitka Optifade Subalpine/Open Country, First Lite Specter): Utilize large, high-contrast light and dark geometric blocks paired with micro-fractals. Use these whenever your engagement distance exceeds 30 yards, or when you are elevated in a treestand against a fractured sky/canopy backdrop (e.g., Sitka Optifade Elevated II).
- Micro-Mimicry Patterns (Mossy Oak Bottomland, Realtree Edge/Timber): Utilize photorealistic bark, reed, and leaf textures. Use these strictly when sitting directly on the ground, backed up flush against tree trunks, flooded timber, or cattail marshes at distances under 30 yards (turkey and waterfowl).
- Solid Earth Tones (Coyote Brown, Olive Drab, Ash Gray): Fully viable for rifle hunting beyond 150 yards provided the color value matches the ambient brightness of the terrain and you stay still.
- Success Checkpoint: You’ll know it worked when you photograph the garment from 35 yards away using your phone set to a Black & White (Monochrome) filter, and the garment’s light-to-dark contrast breaks your torso outline into 3 or more distinct shapes rather than a single dark mass.
- Common Mistake: Wearing dark timber-pattern clothing in an bare late-season deciduous tree against a gray sky. A dark coat creates a stark black silhouette; late-season treestand hunters need patterns dominated by 50%+ white, light gray, and pale tan macro-blocks.
Step 7: Execute the 4-Point Fit, Acoustic, and UV Stress Test
Test the fully assembled clothing system at home for mechanical bow/rifle clearance, decibel output, and UV fluorescence before removing retail tags.
Put on every layer you plan to wear at your coldest static temperature simultaneously, then execute this 4-point inspection protocol:
- The Articulation & Compression Check: Measure your chest circumference over your base layer, then put on your mid-layers and outer shell. The outer shell must have 3 to 4 inches of additional chest room beyond your base measurement so it does not compress your down/synthetic mid-layer loft.
- The Weapon Clearance Check: Put on your hunting pack (loaded to 25 lbs) and shoulder your unloaded rifle 5 times, or draw your compound bow to full anchor. For archery, inspect your bow-arm forearm: the sleeve cuff must sit entirely flat with less than 2 mm of loose fabric fold so the bowstring does not slap your sleeve upon release.
- The 35 dBA Acoustic Check: Enter a quiet closet or bedroom (ambient noise <28 dBA). Place a smartphone running a decibel meter app exactly 36 inches (3 feet) from your chest. Sweep both arms across your ribs and rub your inner thighs together at a 60-BPM pace.
- The 365 nm UV Blacklight Check: Turn off all room lights and shine a 365 nm UV flashlight across every garment, paying special attention to stitching threads, logos, and zippers.
- Success Checkpoint: You’ll know it worked when your bowstring clears your forearm sleeve by at least 0.5 inches at full draw, the acoustic rubbing test peaks below 35 dBA for archery (or 48 dBA for rifle), and zero threads or fabrics glow blue-white under the 365 nm UV light.
- Common Mistake: Sizing your outer shell jacket to fit snugly over a t-shirt in the store. When you layer a 250 GSM base layer and an 800-fill puffy jacket underneath in November, the tight shell crushes the insulating air pockets by 60%, making you colder with the shell on than off.
Common Mistakes and How to Fix Them
1. Outer Shell “Wet-Out” (DWR Saturation Failure)
- The Cause: Dirt, woodsmoke, body oils, and abrasion strip the microscopic factory Durable Water Repellent (DWR) finish off the face fabric. Water stops beading and soaks into the nylon outer layer, reducing membrane breathability (MVTR) by up to 80% and making you feel clammy and wet from internal sweat.
- The Fix: Wash the shell in a front-loading washing machine using 1 oz of pure liquid technical cleaner (Nikwax Tech Wash or Grangers Performance Wash-never standard detergent). While damp, spray the exterior evenly with a PFAS-free polymer DWR treatment (Gear Aid Revivex Durable Water Repellent) from 6 inches away, then tumble dry on medium heat (120°F–140°F) for 40 minutes to thermally cross-link and reactivate the water-repellent polymers.
2. UV Brightener Contamination from Household Laundry
- The Cause: Washing your hunting clothing in a machine that previously held conventional laundry detergents (e.g., Tide, Gain). Standard detergents leave behind residual stilbene-based optical brighteners in the drum that bind permanently to synthetic and wool fibers, causing you to glow under UV light.
- The Fix: Run an empty “clean-out” cycle on your washing machine using hot water and 1 cup of distilled white vinegar to strip detergent residue from the drum. Re-wash your contaminated hunting clothes in cold water using a dedicated UV-free carbon/enzyme wash (Dead Down Wind or Atsko Sport-Wash), and spray any glowing stitching threads with a UV killer compound (Atsko U-V-Killer).
3. Conductive Cold Feet from Boot Sock Over-Layering
- The Cause: Wearing two pairs of thick wool socks inside a tight-fitting hunting boot. The compression constricts capillary blood flow in your toes and eliminates the dead-air insulation pockets inside the wool loops, causing numb toes within 45 minutes.
- The Fix: Strip down to a single 0.5 mm ultralight polypropylene liner sock paired with one midweight or heavyweight cushioned Merino wool sock (70%+ Merino content). Ensure you can freely wiggle all five toes vertically by at least 5 mm inside the laced boot. For sub-20°F static hunts, keep standard boots and add insulated boot blankets (e.g., Arctic Shield Boot Insulators) over your boots only after you climb into your stand.
4. Auditory Spooking from Frozen Hard-Shell Fabrics
- The Cause: Polyurethane-coated fabrics and stiff nylon weaves harden as temperatures drop below 25°F, increasing friction noise from 40 dBA at room temperature to over 60 dBA in sub-freezing air-loud enough for a whitetail deer to pinpoint at 100 yards on a calm morning.
- The Fix: Place your prospective outer jacket inside your home freezer (0°F) for 60 minutes, then immediately perform the Step 7 arm-sweep decibel test. If a garment you already own fails in the cold, wear a cheap oversized brushed fleece pullover over the noisy waterproof shell to dampen surface friction.
5. Scent Retention in 100% Polyester Base Layers
- The Cause: Oleophilic (oil-loving) polyester fibers trap fatty acids from apocrine sweat glands, creating permanent bacterial odor colonies (“permastink”) that survive normal cold-water washes and alert downwind ungulates at 300+ yards.
- The Fix: Soak synthetic base layers for 60 minutes in a 5-gallon bucket containing 4 gallons of cool water, 0.5 cups of baking soda, and 2 oz of enzymatic odor eliminator before machine washing. For future purchases, replace next-to-skin synthetic shirts with 100% 18.5-micron Merino wool.
Variations for Specific Hunting Scenarios
Variation A: The Mobile Backcountry Hunter (Elk, Mule Deer, Sheep)
- Operational Constraints: High physical exertion (2,000–4,000 vertical feet gained daily), strict pack weight limits, 5–10 days away from camp, rapid 40°F daily temperature swings.
- System Adjustments:
- Prioritize Weight & Packability: Every garment must compress down to the size of a 32 oz Nalgene bottle. Total worn + packed clothing weight should not exceed 5.5 to 7.0 lbs.
- Mandatory Side-Zip Ventilation: Outer pants and mid-layer pants must feature hip-to-knee two-way side zippers so you can dump heat on steep climbs and put on/remove puffy insulation pants without taking off your muddy mountain boots.
- Insulation Choice: Use 150 GSM Merino base layers, an ultralight gridded fleece hoody (e.g., Sitka Ambient or KUIU Peloton 97), and an 850+ fill-power hydrophobic down jacket kept strictly in your pack until you stop to glass on windy ridges.
Variation B: The Static Whitetail Treestand Hunter (Midwest / Northeast)
- Operational Constraints: Near-zero physical movement for 4 to 10 hours at a time in 0°F to 35°F temperatures, maximum engagement distance under 35 yards (archery), elevated 18–22 feet in wind-exposed canopy.
- System Adjustments:
- Prioritize Windproofing & Acoustic Silence: Weight and packability do not matter. Pack your heavy outer layers tethered to the outside of your backpack on the walk in, then dress at the base of the tree after cooling down for 10 minutes.
- High-Loft Bibs & Wind Membranes: Replace standard pants with full-coverage insulated bibs featuring a 100% windproof membrane (GORE-TEX INFINIUM) and 133–200 g/m² of PrimaLoft Silver/Gold insulation wrapped in a silent high-pile fleece or berber outer face (e.g., Sitka Fanatic or First Lite Sanctuary).
- Safety Harness Integration: Ensure your outer jacket features a dedicated dorsal pass-through port behind the collar so your full-body fall-arrest tree harness tether connects cleanly behind your neck without bunching up your hood or exposing your back to cold air.
Variation C: The Budget-Conscious Weekend Hunter (<$250 Total Budget)
- Operational Constraints: Strict financial ceiling, hunting 5–8 weekends per year within 1 mile of a vehicle or cabin.
- System Adjustments:
- Decouple Performance from Hunting Brands: Do not buy cheap $40 “hunting” clothes made of cotton-poly blends. Instead, build 80% of your thermal system using non-hunting military surplus and discounted outdoor hiking gear in solid earth tones (Olive, Coyote, Gray), then cover it with a $35 leafy mesh outer suit.
- The Exact $220 Blueprint:
- Base Layer ($45): US Military Surplus ECWCS Gen III Level 1 & Level 2 gridded fleece waffle tops and bottoms (Polartec Power Dry-identical fabric to $130 boutique hunting brands).
- Mid-Layer ($50): Solid dark gray or olive synthetic puffy jacket from an outdoor outlet (e.g., Decathlon Forclaz MT100 or Columbia).
- Outer Layer ($85): RedHead Silent-Hide or Wrangler ATG synthetic stretch pants treated with a $12 can of Camp Dry DWR spray, paired with a wind-resistant fleece jacket.
- Concealment ($40): Lightweight 3D leafy mesh pullover suit (North Mountain Gear) worn over the top-passes the <35 dBA acoustic test and breaks up your outline better than flat printed camo.
How Long Does It Last and What Does It Cost?
Investing in technical hunting apparel follows a predictable cost-per-season curve. Here are the realistic price tiers and functional lifespans based on field abrasion and membrane degradation:
| System Tier | Total System Cost | Expected Lifespan | Key Material Differences |
| Entry-Level / Surplus Hybrid | $150 – $350 | 2 – 4 Seasons | Heavier bulk (9+ lbs total), PU-coated rain gear (lower breathability), synthetic grid bases, solid colors + leafy overlay. |
| Mid-Tier Technical (Badlands, Skre, Huntworth, RedHead) | $550 – $1,100 | 5 – 7 Seasons | 10k/10k waterproof membranes, 100% Merino bases, gridded fleece mid-layers, custom articulated knees/elbows. |
| Elite Backcountry / Whitetail (Sitka, KUIU, First Lite, Stone Glacier) | $1,600 – $2,800+ | 8 – 12+ Seasons | 20k–30k mm GORE-TEX/Toray membranes, 850+ fill down, Cordura-reinforced cuffs, body-mapped micro-climate paneling. |
- Garment Lifespan Benchmarks:
- 150 GSM Ultralight Merino Base Shirts: 3–4 seasons (thin wool wears at backpack shoulder strap friction points unless core-spun with 15–20% nylon).
- Synthetic Puffy Jackets: 4–6 seasons of regular compression (synthetic microfibers lose ~15–20% of their loft recovery after 100+ tight stuff-sack compressions; store hanging uncompressed in the off-season).
- 3-Layer Hard Shell Rain Gear: 7–10+ seasons if washed twice annually and kept free of campfire sparks and barbed-wire punctures.
Frequently Asked Questions (FAQ)
Should I size up when buying a hunting outer shell jacket?
Check the manufacturer’s fit profile before sizing up. Technical hunting brands (Sitka, KUIU, First Lite) engineer “system-fit” outer shells with pre-built extra volume across the chest and shoulders to accommodate mid-layers at your normal size. If buying general outdoor hiking shells (Arc’teryx, Patagonia), size up by one full size to prevent insulation compression.
Can I use ski or snowboarding clothes for late-season deer hunting?
You can use ski clothing for rifle hunting from an enclosed box blind, but never for archery or open-treestand hunting. Ski outer shells use high-denier ripstop nylon designed to survive high-speed ice slides; they produce 55–68 dBA of friction noise when you move, which will immediately spook game animals within 100 yards.
How often should I wash my hunting clothes during the season?
Wash next-to-skin Merino wool base layers every 3–5 days of field use, and synthetic base layers after every 1–2 hunts. Wash insulated mid-layers and waterproof outer shells only once or twice per season (or when visibly caked in mud or blood), as frequent washing degrades DWR coatings and breaks down synthetic insulation loft.
Is Merino wool or synthetic polyester better for hunting socks?
Merino wool blends (specifically 65–75% Merino wool, 20–30% nylon, and 2–5% Lycra spandex) are superior for all hunting applications. Pure synthetic socks saturate quickly inside low-breathability leather or rubber hunting boots, causing friction blisters and rapid conductive heat loss, whereas Merino wool absorbs up to 30% of its weight in moisture vapor without feeling clammy.
Do scent-eliminating carbon and silver-lined hunting suits actually work?
Silver-ion and antimicrobial fabric treatments effectively stop bacteria from producing human body odor on the garment itself, but no clothing fabric can contain breath odor, hair dander, or convective air plumes escaping from neck and cuff openings. Prioritize playing the wind using thermal drop indicators over spending extra budget on carbon-lined outer suits.
Conclusion
Knowing how to choose hunting clothing comes down to treating your apparel as an integrated life-support and stealth system rather than a collection of matching camo shirts. When you audit your metabolic output first, build a moisture-wicking Merino or synthetic foundation, protect your thermal loft with windproof and waterproof membranes, and verify your kit with home UV and decibel tests, you eliminate the environmental distractions that end hunts early. Start by measuring your chest over a mid-layer today, check your local weather records, and build your system from the skin out.