
Learning how to choose hunting backpacks ensures you can haul 100+ pounds of gear and harvested game meat without spinal compression or structural failure. By completing eight sequential steps across anatomical measurement, frame specification, and weighted validation—taking 45 minutes at an easy difficulty level—you will match your exact torso length to a load-bearing frame.
Before You Start: Requirements & Specs
- Time Required: 45 minutes (15 minutes for measurements and spec filtering; 30 minutes for physical load-testing).
- Difficulty Level: Easy (requires careful anatomical landmark palpation).
- Typical Cost Range: $150–$900+ depending on frame architecture.
- Tools & Materials Checklist:
- 1 flexible tailor’s tape measure (60-inch minimum).
- 1 roll of 1-inch masking or painter’s tape.
- 1 helper (mandatory for accurate spinal measurement; self-measuring introduces a 1.5-to-2-inch error).
- 1 standard hunting base layer and mid-layer shirt.
- 50–60 lbs of ballast (one bag of play sand or olympic weight plates wrapped in a towel) for post-selection testing.
- Prerequisites: Know your primary target species (e.g., eastern whitetail vs. western elk), primary weapon (compound bow vs. bolt-action rifle), and longest planned trip duration.
Phase 1: Anatomical Sizing and Biometrics
Standard hiking packs cushion fixed volumes of soft camping gear, whereas a hunting backpack is a load-carriage survival tool engineered to transfer 70–80% of dynamic weight directly onto your skeletal hips. Achieving that weight transfer requires sub-inch biometric precision before you look at a single brand.
Step 1: Measure Your Exact C7-to-Iliac Torso Length
Measure your vertical spine distance from the seventh cervical vertebra (C7) to the horizontal plane of your iliac crest using a flexible tape measure.
- Put on a thin hunting base layer and stand straight with your feet shoulder-width apart and your chin tilted down toward your chest at a 45-degree angle.
- Have your helper locate the C7 vertebra—the single large, protruding bone at the base of your neck where the slope of your shoulders meets your spine. Place a horizontal strip of masking tape directly across the center of this bone.
- Place your hands on your hips with your thumbs pointing toward your spine and your index fingers resting on the very top shelf of your hard hip bones (iliac crest). Push inward firmly through any soft tissue until you are resting directly on the top edge of the bone.
- Have your helper stretch a strip of masking tape horizontally across your lower back, connecting the tips of your two thumbs.
- Stand up straight, look directly ahead, and have your helper measure the distance from the center of the C7 tape straight down the contour of your spine to the center of the lower back tape. Record this number to the nearest 0.25 inch.
- Map your measurement to standard industry frame sizing: Small (15″–18″), Medium (18″–21″), or Large/Tall (21″+).
- Success Checkpoint: You’ll know it worked when your helper repeats the measurement twice after you bend over and stand back up, and both readings fall within 0.25 inches of each other.
- Common Mistake: Measuring by total body height or letting your helper measure to your belt line instead of your iliac crest. A 6’2″ hunter can have a short 17.5-inch torso and long legs; buying a Large frame based on height causes the load lifters to sit above your head, eliminating all shoulder relief.
Step 2: Measure Your Iliac Hip Circumference
Wrap the flexible tape measure around your pelvis directly over the crest of your hip bones while wearing your standard hunting mid-layers.
- Keep your hands positioned on the top shelf of your iliac crest (approx. 1.5 to 2 inches higher than where standard blue jeans sit).
- Route the tape measure around your torso so the center of the tape sits directly over those top bone points in the front and crosses the masking tape line on your lower back.
- Pull the tape snug—applying roughly 5 lbs of tension so it compresses your clothing slightly without indenting your skin—and record the circumference in inches.
- Deduct 4 to 6 inches from this measurement to verify the maximum closed circumference of the pack’s padded hip belt wings.
- Success Checkpoint: You’ll know it worked when your recorded iliac measurement is 1.5 to 3 inches larger than your commercial pant waist size.
- Common Mistake: Ordering a hip belt based on your jean waist size. Pant manufacturers use vanity sizing, and jeans sit below the iliac crest. If the padded wings of your hip belt touch or overlap when buckled, the belt has bottomed out and will slide down onto your glutes the moment you load 80 lbs of elk quarters.
Phase 2: Specifying Frame, Capacity, and Materials
Once you have your two biometric numbers, filter the pack market by structural architecture, cubic volume, and outer shell acoustics.
| Feature | External Frame Packs | Internal Frame / Modular Systems |
| Heavy Load Hauling (80+ lbs) | Excellent. Rigid aluminum or composite frames prevent structural sagging. | Good to Excellent. Relies on contoured carbon fiber or aluminum stays. |
| Agility & Silhouette | Poor. Bulky, high center of gravity; catches on low timber branches. | Excellent. Hugs torso contours and moves dynamically during stalks. |
| Versatility & Meat Hauling | Moderate. Hauls odd items easily (coolers, logs, bone-in moose quarters). | Superior. Bags swap in minutes or compress flat; utilizes an integrated meat shelf. |
| Ventilation | Superior. Frame structure creates a physical air gap across your back. | Moderate. Contoured lumbar pads and harness sit flush against your back. |
| Empty Weight | Heavy (6.5–9.0 lbs). High structural mass penalizes fast hill climbs. | Light (4.5–6.5 lbs). Optimized strength-to-weight ratios. |
Step 3: Select Your Frame Architecture and Spine Profile
Select an internal, external, or modular frame system rated for at least 100 pounds of static load, and match the stay curvature to your lower back geometry.
- Choose Modular Frame-and-Bag Systems if you hunt big game (elk, mule deer, bear) where you must pack out meat. These feature a standalone carbon fiber or composite frame with a dedicated meat shelf—a load sling that separates the main bag from the frame so you can sandwich 60–80 lbs of dense game meat directly against your spine (your center of gravity) while keeping blood off your sleeping bag.
- Choose Internal Frame Packs (sewn-in aluminum or composite stays) only for eastern whitetail treestand hunts or pronghorn day hunts where game is dragged out whole or loaded directly into a truck bed.
- Choose External Frame Packs only if you routinely haul awkward, rigid loads over 100 lbs (such as quartered moose on Alaska tundra or bear bait barrels) on open trails where branch snagging is irrelevant.
- Check your lumbar profile: stand with your heels, glutes, and shoulder blades pressed flat against a wall. Slide your flat hand between your lower back and the wall. If only your fingers fit, order flat/straight frame stays; if your entire fist passes through easily, order curved/contoured stays and a thicker anatomical lumbar pad.
- Verify the empty weight specification: ensure a full modular frame-and-bag setup weighs between 4.5 lbs and 6.5 lbs empty. Reject any modern backcountry pack exceeding 7.5 lbs empty.
- Success Checkpoint: You’ll know it worked when the manufacturer’s specification sheet explicitly states a 100+ lb load rating and lists a dedicated load shelf between the frame sheet and bag.
- Common Mistake: Buying a pack for the camping gear rather than the meat. A traditional hiking internal frame holds 50 lbs of fluffy down gear comfortably, but its stays will buckle horizontally and barrel into your spine when loaded with a single dense, fluid-heavy 75-lb bone-in hindquarter.
Step 4: Calculate Required Bag Volume by Trip Duration
Match your pack bag’s cubic-inch capacity to the longest expedition you take each season, using compression straps to shrink excess volume on shorter trips.
- For Sunrise-to-Sunset Day Hunts: Select a capacity of 1,500 to 2,500 cu in (25–40L). This holds a first-aid kit, kill kit, headlamp, water bladder, puffy insulation jacket, and spotting scope without excess fabric flapping in the wind.
- For 2-to-4 Day Backcountry Bivouacs: Select a capacity of 3,500 to 4,800 cu in (55–75L). This accommodates a 3-season tent, sleeping pad, 15°F sleeping bag, stove, and 3,500 calories of food per day.
- For 5-to-10+ Day Wilderness Expeditions: Select a capacity of 5,000 to 7,500+ cu in (80–120L+). Late-season cold-weather hunts require synthetic insulation and 0°F bags that consume double the volume of early-season archery gear.
- If You Do Both Day Hunts and Multi-Day Hunts: Buy a modular frame paired with a 5,000–6,000 cu in bag. On day hunts, cinch the horizontal side compression straps down until the bag is 2 inches thick, or spend $150–$220 on a secondary 2,000 cu in day-bag that attaches to the same frame via 3-bar sliders in under 4 minutes.
- Success Checkpoint: You’ll know it worked when your sleep system, shelter, and food fit inside the main vertical compartment with zero gear strapped to the exterior of the pack (except your tripod and weapon).
- Common Mistake: Over-organizing with built-in zippered pockets. Every external zippered compartment adds 4 to 8 ounces of heavy zipper tape, sliders, and seam allowances. Choose a clean, single-cavity main bag and organize small gear inside using ultralight 1-ounce silnylon pull-out pouches.
Step 5: Match Outer Shell Fabric to Terrain and Acoustics
Select your pack’s face fabric by balancing decibel output against abrasion resistance and hydrostatic waterproof ratings.
- For Close-Range Archery & Dense Timber (Under 40 Yards): Select brushed microfiber, fleece, or softshell laminates. When an oak branch scrapes across brushed polyester at 20 yards from a bedded buck, it produces a dull, low-frequency sound under 30 decibels that mimics natural movement.
- For Western Mountain, Talus Rock, & Brush Busting: Select 500D Cordura Nylon. It provides the optimal threshold of tear resistance against granite shale and thorny buckbrush without the excessive deadweight of older 1000D military Cordura.
- For Temperate Rainforests & Wet Tundra (PNW / Southeast Alaska): Select X-Pac (VX21/VX42), TPU-coated Cordura, or UHMWPE (Ultra/Dyneema) blends. Standard nylon absorbs up to 1.5 lbs of water weight during a 12-hour rainstorm; laminated fabrics are 100% non-absorbent and impervious to blood stains.
Practitioner Warning: Never buy an exposed UHMWPE/Dyneema pack for close-range timber bowhunting. While its strength-to-weight ratio is unmatched, the stiff polyethylene laminate acts like a drumhead—producing a high-pitched, metallic zipping sound when scraped against dry pine needles or bark.
- Success Checkpoint: You’ll know it worked when you rub a fingernail briskly across the fabric sample and the sound profile matches your typical shooting distance (dead silent for sub-40-yard bowhunting; durable slight rustle acceptable for 250-yard rifle hunting).
Step 6: Verify Weapon Carriage and Structural Hardware
Inspect the pack’s weapon retention geometry and physical hardware specs to ensure hands-free climbing and zero webbing slippage under load.
- For Bowhunters: Require a flat front pack panel with two reinforced autolock compression straps and a deployable lower bow bucket (cam cradle). Verify that the sternum strap and shoulder harness contain zero bulky plastic D-rings or thick buckles on your bow-arm side that could interfere with string clearance at full draw.
- For Rifle Hunters: Select either a centralized drop-down buttstock boot (which centers the 9-lb rifle along your spine for balance in steep chutes) or an integrated side scabbard for sub-5-second quick-draw access.
- Audit the Zippers and Stitching: Verify the pack uses YKK #10 urethane-coated coil zippers on main structural entries and load panels (#8 is acceptable only on lid pockets). Confirm bar-tack stitching (dense, high-thread-count zig-zag reinforcement) is present at every webbing-to-fabric junction, especially at the load-lifter anchors and hip belt attachment points.
- Success Checkpoint: You’ll know it worked when you can mount your unloaded rifle or bow to the pack, shake the frame inverted by the haul loop, and the weapon shifts less than 1 inch in any direction.
- Common Mistake: Using standard cam-lock buckles on packs carrying over 60 lbs. Under wet, freezing conditions, standard nylon webbing slips through cheap plastic buckles; insist on ITW Nexus or Duraflex autolock buckles that mechanically bite into the webbing when tension increases.
Phase 3: Physical Validation and Load Testing
Never cut the retail tags off a hunting backpack or take it into the field until you validate its load-transfer geometry under real weight inside your living room.
Step 7: Fit the Unloaded Frame to Your Torso
Adjust the vertical shoulder harness height and load-lifter anchor points on the frame before adding weight.
- Loosen all hip belt straps, shoulder straps, sternum straps, and load lifters by at least 4 inches.
- Put the empty pack on and position the horizontal center of the padded hip belt wings directly over the top shelf of your iliac crest. Buckle the hip belt and pull the forward-pull tension straps tight until the belt grips your pelvis firmly.
- Look in a mirror from the front: verify there is a 4-to-6-inch gap of exposed webbing between the two padded ends of the hip belt across your stomach.
- Snug the shoulder straps down just enough that the foam contours smoothly over your trapezius muscles without pulling the pack downward.
- Check the shoulder harness yoke (where the shoulder straps attach to the back of the frame): the anchor point must sit 1 to 1.5 inches below the C7 vertebra you marked in Step 1. If the straps float above your shoulders or pinch your neck, remove the pack, release the hook-and-loop or tri-glide harness lock, and slide the torso yoke up or down the frame stays until it wraps cleanly over your shoulders with zero air gap.
- Success Checkpoint: You’ll know it worked when you can slide two flat fingers comfortably between the top of your shoulders and the shoulder straps while the hip belt supports 100% of the empty frame’s weight.
Step 8: Conduct a 60-Pound Weighted Load Test
Load the meat shelf with 60 pounds of dense deadweight and wear the pack for 20 minutes up and down stairs to confirm 70–80% skeletal weight transfer.
- Unbuckle the main bag from the frame to expose the load shelf. Place a 50-to-60-lb sandbag or wrapped weight plate on the shelf, positioning the bottom of the weight level with the top of the lumbar pad (never at the very bottom of the pack bag).
- Cinch the internal load-compression straps tightly until the weight cannot shift laterally when you twist your torso. Reattach and compress the outer bag.
- Put the pack on, lean forward at a 30-degree angle, seat the hip belt over your iliac crest, and crank the hip belt tension straps tight.
- Stand upright, snug the shoulder straps, and buckle the sternum strap across your chest at a point 2 inches below your collarbones (tightening it only enough to keep the shoulder straps from splaying outward; never constrict ribcage expansion).
- Reach up by your ears and pull the load-lifter straps upward and forward until they form a clean 45-degree angle (acceptable range: 30° to 45°) rising from the top of your shoulder harness to the top of the frame stays.
- Walk up and down a flight of stairs or a steep driveway for 20 continuous minutes.
- Success Checkpoint: You’ll know it worked when the load-lifter straps lift the top of the shoulder pads 0.25 inches off the crest of your trapezius muscles, 70–80% of the downward pressure rests squarely on your hip bones, and you experience zero tingling in your fingers or pinching in your collarbones after 20 minutes.
- Common Mistake: Over-tightening the load lifters until the shoulder straps curl up into an arch. If you pull the load lifters completely tight, you pull the upper frame into the back of your head and levers the bottom of the lumbar pad away from your lower back, causing the entire 60-lb load to slip down onto your tailbone.
Common Mistakes and How to Fix Them
Even an elite $800 modular pack will fail in the field if adjusted improperly. Use these diagnostic recovery protocols when issues arise under load:
- Symptom: Severe Shoulder and Trap Pain During Pack-Outs.
- Root Cause: The frame torso length is set too short, or the hip belt has slipped below your iliac crest, transferring 100% of the load onto your clavicles and trapezius muscles.
- The Fix: Stop, lean forward at the waist to take the weight off your hips, and hike the hip belt up 2 inches so the lumbar pad sits squarely in the small of your back. Cinch the hip belt 1 inch tighter than feels comfortable, loosen your shoulder straps by 1.5 inches, and tension the load lifters to a strict 45-degree angle. If your load lifters are running horizontally (0 degrees) instead of rising upward toward the frame, adjust your torso harness down by 1 inch.
- Symptom: Lower Back Chafing, Tailbone Bruising, or Belt Slippage.
- Root Cause: The pack is sliding down onto your glutes because your torso harness is set too long (forcing the hip belt down), or the lumbar pad does not match your spinal curve.
- The Fix: Shorten the torso harness setting on the frame by 1 to 1.5 inches so the shoulder straps arrest the downward slide at the exact moment the hip belt hits your iliac crest. If the lumbar pad still slips over slick polyester base layers, open the hook-and-loop lumbar pocket and add a 0.5-inch high-density closed-cell foam shim to increase lower-back bite.
- Symptom: Rhythmic Frame Squeaking With Every Step.
- Root Cause: Fine silts, pine resin, or dried blood have worked between the carbon stays and the Cordura stay sleeves, or between modular Delrin frame hinges.
- The Fix: Strip the bag off the frame and pull the vertical stays out of their sleeves. Wipe the stays down with a damp cloth, blow the dust out of the webbing sleeves, and rub a thin coat of unscented baby powder (talc) or dry food-grade silicone lubricant onto the stay tips and frame contact points before reassembling. Never use petroleum-based WD-40, which degrades nylon stitching and broadcasts human scent across the drainage.
- Symptom: Pack Barrels Outward and Pulls You Backward on Steep Ascents.
- Root Cause: Heavy meat or water bladders were loaded at the bottom or outer back wall of the main bag rather than compressed high and tight against the frame sheet.
- The Fix: Unpack the bag. Place light, compressible gear (sleeping bag) in the very bottom compartment. Strap the 60–80 lb meat bag into the dedicated load shelf so the center of mass sits directly between your shoulder blades and mid-back, pulling your center of gravity forward over your boots.
Process Variations by Hunting Style and Scenario
Adjust the baseline selection process when operating under these three common hunting constraints:
- The Eastern Whitetail Treestand / Saddle Hunter: Skip the 26-inch tall carbon meat-hauling frame; tall stays will smack the bottom of your climbing sticks and rattle against the tree trunk when you turn to draw your bow. Choose a 1,500–2,200 cu in internal-frame daypack constructed from brushed tricot fleece with a rigid, flat thermo-molded bottom so the pack stands upright at the base of the tree or hangs cleanly from a single gear hook without collapsing inward.
- Short-Torso and Female Hunters (Under 16.5″ Torso Length): Standard unisex hunting frames typically bottom out at an 18-inch minimum stay length, which renders the load lifters useless on torsos measuring 14.5 to 16.5 inches. Filter exclusively for frames offering 22-inch frame heights (as opposed to standard 24-to-26-inch frames), S-curve shoulder straps (which contour around chest tissue without rubbing the armpits), and split-webbing articulated hip belts that allow the top and bottom edges of the belt to tighten at independent angles around a flared pelvis.
- The Budget-Conscious Beginner (Under $300 Total Spend): Do not buy a cheap $180 internal-frame camo pack from a big-box store if you are hunting elk; the thin aluminum stays will permanently bend under a single hindquarter. Instead, split your system: purchase a military-surplus MOLLE II or ALICE external frame or a dedicated freighter frame (e.g., ALPS OutdoorZ Commander Frame for ~$150) and strap a waterproof 55L dry bag to it. You sacrifice a 1.5-lb weight penalty and sleek brush agility, but gain an indestructible 120-lb load rating at one-quarter the cost of a carbon modular pack.
How Long Does It Take and What Does It Cost?
| Tier | Typical Price Range | Expected Lifespan | Structural Characteristics & Example Entities |
| Entry-Level | $150 – $300 | 2–4 seasons (moderate use) | Fixed internal frame daypacks or heavy aluminum external freighter frames. 6.5–8.5 lbs empty. Best for treestand hunts or occasional rifle trips. |
| Mid-Tier | $300 – $500 | 5–8 seasons | Dedicated hunting packs with introductory load shelves, polycarbonate/aluminum frames, and 500D Cordura or brushed fabrics (e.g., Eberlestock, Badlands Gear, Mystery Ranch imported lines). |
| Premium Modular | $500 – $900+ | 10+ years to lifetime | Custom-sized carbon fiber or composite frames, interchangeable bags, Berry-compliant USA manufacturing, X-Pac/Cordura construction, 4.5–6.0 lbs empty (e.g., Stone Glacier, EXO K4, KUIU, Seek Outside). |
Frequently Asked Questions
How tall should my hunting backpack frame be?
Choose a 24-inch frame height for torsos under 18.5 inches or if you regularly crawl through thick alder brush and timber where overhead clearance is tight. Choose a 26-inch frame height if your torso exceeds 19 inches or if you regularly haul loads over 80 pounds, as taller stays maintain a steeper 45-degree load-lifter angle.
Can I use a standard backpacking pack for western elk hunting?
You can use a backpacking pack to carry your camp in, but most fail during the meat pack-out. Ultralight hiking packs cap their comfort rating at 35–45 pounds, lack blood-proof load shelves, and use thin 100D–210D nylon that rips when loaded with sharp bone-in elk quarters or scraped through burnt deadfall timber.
How do I clean blood out of a hunting backpack without ruining the fabric?
Submerge the pack in a bathtub filled with cold water (never hot water, which coagulates proteins and sets blood stains permanently into nylon fibers). Scrub bloodied areas with a soft brush using unscented enzymatic detergent or Dawn dish soap, soak for 45 minutes, rinse thoroughly, and hang dry in the shade away from UV sunlight.
Should I buy a camouflage or solid-color hunting backpack?
Ungulates see poorly in the red-green spectrum and detect hunter movement far faster than stationary color patterns. If you want your pack to double for summer scouting, airline travel, or off-season backpacking without drawing attention at trailheads, choose solid earth tones (Coyote Brown, Ranger Green, or Foilage Grey) over proprietary camouflage patterns.
How much does a quartered elk or mule deer actually weigh inside a pack?
A boned-out mature mule deer buck yields 65 to 85 pounds of meat, allowing a seasoned hunter to extract the entire animal plus camp in one brutal trip or two moderate trips. A mature bull elk yields 180 to 240 pounds of boned-out meat (or 260 to 320 pounds bone-in), requiring 3 to 4 separate pack-out trips at 70 to 90 pounds per load.
Mastering how to choose hunting backpacks boils down to respecting your spinal anatomy first and your gear list second. By measuring your exact C7-to-iliac torso length, verifying a 4-to-6-inch hip belt gap, selecting a 100-lb rated modular frame, and validating the setup with a 60-pound weighted stair test, you guarantee your pack will carry the harvest out of the mountains safely.
Recommend Specific Hunting Backpack Models
Here are the three best-value hunting backpack models across the entry-level, mid-tier, and premium modular categories, calibrated for a standard Medium torso (18″–20″), all-around big game capability (day hunts to 5-day pack-outs), and dual bow/rifle carriage:
| Specification | Entry-Level Best Value | Mid-Tier Workhorse | Premium Modular Gold Standard |
| Model | ALPS OutdoorZ Commander + Pack Bag | Mystery Ranch Metcalf 75 | Exo Mtn Gear K4 5000 |
| Typical Street Price | $180 – $280 | $520 – $575 | $699.99 |
| Frame Architecture | External aluminum freighter frame + detachable bag | Internal composite/carbon Ultra Light MT frame + Overload shelf | Modular carbon fiber stays + pivoting K4 frame |
| Bag Capacity | 5,250 cu in (86L) | 4,575 cu in (75L) | 5,010 cu in bag + 648 cu in lid (5,658 cu in total) |
| Empty Weight | 7 lbs 15 oz (5 lbs 2 oz frame only) | 5 lbs 5 oz (5.3 lbs) | 5 lbs 13 oz (with lid) |
| Torso Sizing Range | 17″ – 23″ (clevis pin adjustable) | 15.5″ – 23″ (telescoping yoke; order Medium or Large) | Order 25″ Frame Height for an 18″–20″ torso |
| Load Rating | 120+ lbs | 80 – 100+ lbs | 150+ lbs (verified non-deforming) |
1. Entry-Level Best Value: ALPS OutdoorZ Commander + Pack Bag ($180–$280)
If you want to haul elk or quartered deer on an entry-level budget without your frame collapsing, skip sub-$250 internal-frame camo packs and buy the ALPS OutdoorZ Commander + Pack Bag. It pairs a rigid, powder-coated external aluminum freighter frame with a removable 5,250-cubic-inch ripstop nylon bag.
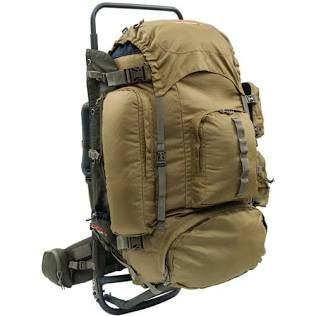
- Why It Wins This Tier: You get two dedicated tools in one. You can hike into base camp with the 86L bag attached, uninzip the bag at your tent, and hunt with just the bare aluminum frame, fold-down freighter shelf, and integrated lashing straps.
- Torso & Hip Fit: Uses anodized cotter and clevis pins that adjust from a 17″ to 23″ torso in 1-inch increments, paired with a wide 33″–60″ waist belt.
- Weapon Carriage: Features an integrated drop-down rifle holder on the side of the frame and heavy lashing straps that secure a compound bow across the back.
- The Trade-Off: At 7 lbs 15 oz empty, it exceeds the 6.5-lb backcountry benchmark, and the exposed top frame bar will catch on low alder branches if you are stalking through thick timber.
2. Mid-Tier Workhorse: Mystery Ranch Metcalf 75 ($520–$575)
Sitting right at the upper boundary of the mid-tier market (frequently on sale near $519), the updated Mystery Ranch Metcalf 75 bridges the gap between recreational packs and custom $800 systems. Built on the updated Ultra Light MT Frame with 330D Lite Plus Cordura, it sheds nearly two pounds compared to older military-spec models while retaining Mystery Ranch’s Overload Shelf.
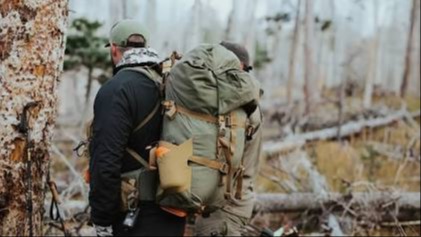
- Why It Wins This Tier: Its telescoping fiberglass/composite shoulder yoke micro-adjusts to your exact C7 vertebra height in under 60 seconds using the plastic frame sheet itself as a built-in torso tool. The roll-top 75L bag compresses completely flat against the frame for silent day-hunting, then expands to swallow 5 days of spike-camp gear.
- Torso & Hip Fit: Available in 4 frame/belt sizes (S–XL) covering 15.5″ to 23″ torsos. For a standard 18.5″–20″ torso and 32″–36″ iliac hip measurement, order the Medium.
- Weapon Carriage: Dual side compression straps with autolock buckles lock down a rifle tripod or bow cam without shifting.
- The Trade-Off: Some hunters report frame squeaking when fine dust enters the stay sleeves (apply the unscented baby powder fix from Step 8 before your trip), and hip belt pockets must be purchased separately.
3. Premium Modular Gold Standard: Exo Mtn Gear K4 5000 ($699.99)
If you want a “buy once, cry once” pack built in the USA that handles 120+ lb bone-in elk quarters without budging an inch on your iliac crest, the Exo Mtn Gear K4 5000 is the benchmark in modern backcountry hunting. Notice in the visual below how the exact same 5,000-cubic-inch 500D Cordura bag compresses down to a 3-inch-thick daypack profile on the left or expands for a 7-day wilderness expedition on the right:
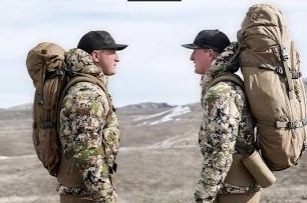
- Why It Wins This Tier: Unlike static frames, the K4 uses twin contoured carbon-fiber vertical stays paired with an independent upper/lower frame flex joint that rotates dynamically with your hips and shoulders as you side-hill steep shale. Its anatomical lumbar pad and dual-pull forward-cinch hip belt eliminate belt slippage under heavy meat loads.
- Custom Sizing to Order: Exo does not use generic “Medium/Large” compromises; you select your exact Frame Height (22″, 23.5″, 25″, or 26.5″) and Hipbelt Size (XS to XL) independently at checkout. For an 18″–20″ torso, select the 25″ frame height to achieve an immediate 45-degree load-lifter angle.
- Weapon & Optics Integration: Includes two full-length pleated zippered side pockets that swallow an 85mm spotting scope even when the main bag is stuffed full, plus stretch tripod/rifle boot pockets on both sides.
- The Trade-Off: High upfront investment ($699.99 direct-to-consumer), and the 500D Cordura fabric requires careful stalk control inside 30 yards compared to brushed fleece whitetail packs.